Thursday, October 23, 2014

This is the time of year when I start craving savory tarts. This vegetarian tart has vinegar-roasted onions, mushrooms, and ricotta cheese, making it a great appetizer for a group, or a dinner for two when served with a side salad. Why not? It's getting cold out there and sometimes you just need a dinner that feels like the food equivalent of sliding on a cashmere sweater: decadent and yet perfectly functional.
The recipe is loosely based on one by Suzanne Goin in her magnificent book,Sunday Suppers at Lucques. It might sound a little complicated, but I promise it's not. As long as you have the ingredients on hand and some time to luxuriate in the kitchen, it's really not much of a challenge.
For mushrooms, you can use a mixture of varieties or stick with one. I like to combine the common cremini with some rehydrated dried porcini. For onions, try cipollini, sweet Vidalia, or standard yellow or purple onions.

Onion and Mushroom Tart

Makes one 9-inch tart
For the crust:2 cups unbleached all-purpose flour
1/4 teaspoon salt
3/4 cup (1 1/2 sticks) cold unsalted butter, cut into small cubes
2 tablespoons ice water
For the filling:1 pound onions
3 tablespoons olive oil, divided
2 tablespoons balsamic vinegar
1 1/4 teaspoons salt, divided
1/2 teaspoon freshly ground black pepper, divided
2 tablespoons butter
1 1/2 pounds mushrooms, sliced
1 large egg
3/4 cup ricotta cheese
3/4 cup Parmesan cheese, divided
1/4 cup heavy cream
1/4 cup chopped chives or green onions
Preheat the oven to 350° F.
To make the dough, place the flour and salt in a food processor and pulse. Drop in the butter and pulse until just barely the texture of oatmeal. Add the ice water slowly and pulse once or twice, until the dough clumps together. Turn onto a floured board and form into a ball. Wrap in plastic wrap and chill in refrigerator for at least 30 minutes.
Meanwhile, peel and remove the root ends from the onions. Slice them in quarters and place in a pie dish or small roaster. Pour 2 tablespoons of olive oil, the vinegar, 1 teaspoon salt and 1/4 teaspoon pepper over top. Roast until the onions are soft and begin to color but still hold their shape, about 45 minutes. Remove from the oven and cool.
While the onions are roasting, cook the mushrooms. Over medium heat, melt the butter. Add mushrooms, 1/4 teaspoon salt and 1/4 teaspoon pepper, and sauté for about 5 minutes until golden. Remove from the heat.
When pastry dough has chilled, roll it out onto a lightly floured surface to a circle roughly 12 inches in diameter. Gently transfer to a tart ring, and fit into the ring evenly. Pierce bottom with a fork and return to refrigerator to chill another 20 to 30 minutes.
Separate the egg and transfer the yolk to a small bowl; reserve the egg white for the topping. Mix the egg yolk, ricotta, remaining 1 tablespoon olive oil, 1/2 cup of Parmesan, and chives. Remove the tart shell from refrigerator. Spread the ricotta mixture evenly across the bottom of the tart shell. Nestle the onions across ricotta base and scatter the mushrooms in between onions.
In another small bowl, beat the reserved egg white, heavy cream and the remaining 1/4 cup Parmesan. Pour mixture evenly over top of onion and mushroom filling.
Cover the tart with foil and bake at 350°F for 30 minutes. Remove the foil and bake another 15 minutes, until top is bubbling and crust is slightly brown, but not too dark.
Sprinkle chives over top before servings. Serve warm or at room temperature.
11:49 PM Admin0
This is the time of year when I start craving savory tarts. This vegetarian tart has vinegar-roasted onions, mushrooms, and ricotta cheese, making it a great appetizer for a group, or a dinner for two when served with a side salad. Why not? It's getting cold out there and sometimes you just need a dinner that feels like the food equivalent of sliding on a cashmere sweater: decadent and yet perfectly functional.
The recipe is loosely based on one by Suzanne Goin in her magnificent book,Sunday Suppers at Lucques. It might sound a little complicated, but I promise it's not. As long as you have the ingredients on hand and some time to luxuriate in the kitchen, it's really not much of a challenge.
For mushrooms, you can use a mixture of varieties or stick with one. I like to combine the common cremini with some rehydrated dried porcini. For onions, try cipollini, sweet Vidalia, or standard yellow or purple onions.

Onion and Mushroom Tart

Makes one 9-inch tart
For the crust:2 cups unbleached all-purpose flour
1/4 teaspoon salt
3/4 cup (1 1/2 sticks) cold unsalted butter, cut into small cubes
2 tablespoons ice water
For the filling:1 pound onions
3 tablespoons olive oil, divided
2 tablespoons balsamic vinegar
1 1/4 teaspoons salt, divided
1/2 teaspoon freshly ground black pepper, divided
2 tablespoons butter
1 1/2 pounds mushrooms, sliced
1 large egg
3/4 cup ricotta cheese
3/4 cup Parmesan cheese, divided
1/4 cup heavy cream
1/4 cup chopped chives or green onions
Preheat the oven to 350° F.
To make the dough, place the flour and salt in a food processor and pulse. Drop in the butter and pulse until just barely the texture of oatmeal. Add the ice water slowly and pulse once or twice, until the dough clumps together. Turn onto a floured board and form into a ball. Wrap in plastic wrap and chill in refrigerator for at least 30 minutes.
Meanwhile, peel and remove the root ends from the onions. Slice them in quarters and place in a pie dish or small roaster. Pour 2 tablespoons of olive oil, the vinegar, 1 teaspoon salt and 1/4 teaspoon pepper over top. Roast until the onions are soft and begin to color but still hold their shape, about 45 minutes. Remove from the oven and cool.
While the onions are roasting, cook the mushrooms. Over medium heat, melt the butter. Add mushrooms, 1/4 teaspoon salt and 1/4 teaspoon pepper, and sauté for about 5 minutes until golden. Remove from the heat.
When pastry dough has chilled, roll it out onto a lightly floured surface to a circle roughly 12 inches in diameter. Gently transfer to a tart ring, and fit into the ring evenly. Pierce bottom with a fork and return to refrigerator to chill another 20 to 30 minutes.
Separate the egg and transfer the yolk to a small bowl; reserve the egg white for the topping. Mix the egg yolk, ricotta, remaining 1 tablespoon olive oil, 1/2 cup of Parmesan, and chives. Remove the tart shell from refrigerator. Spread the ricotta mixture evenly across the bottom of the tart shell. Nestle the onions across ricotta base and scatter the mushrooms in between onions.
In another small bowl, beat the reserved egg white, heavy cream and the remaining 1/4 cup Parmesan. Pour mixture evenly over top of onion and mushroom filling.
Cover the tart with foil and bake at 350°F for 30 minutes. Remove the foil and bake another 15 minutes, until top is bubbling and crust is slightly brown, but not too dark.
Sprinkle chives over top before servings. Serve warm or at room temperature.

Wednesday, October 22, 2014

The Famous Husk Cheeseburger Recipe
Photograph by Peter Frank Edwards
Husk Cheeseburger 
Makes 10 cheeseburgers
When I opened Husk, I knew we had to have a cheeseburger on the menu. Everyone has their own idea of the perfect burger; mine was inspired by the drive-in that my family used to take me to when I was young. Robo’s was the only real “restaurant” in my hometown, and my family just loved it. We would go there after my Little League baseball games. As a game wound down, I would be daydreaming about that burger, shake, and crinkle-cut fries. It’s probably the reason for some missed fly balls. 
What I remember most about the cheeseburger was the squishy bun and how wonderful it was to eat the double patty covered in gooey American cheese. This recipe is a tip of the hat to that burger. I’ve changed it a little to make it my own—I wouldn’t dare try and replicate the burger from Robo’s. This recipe feeds a crowd, but you can halve it for a smaller group. 
If you don’t have a meat grinder, ask the butcher to grind the meats for you.
Special Sauce
1¾ cups mayonnaise, preferably Duke’s
1¼ cups yellow mustard
5 tablespoons ketchup
½ cup Bread-and-Butter Pickles, drained and cut into ⅛-inch dice
¼ cup pickled jalapeños, drained and cut into ⅛-inch dice
Grated zest (use a Microplane) and juice of 1 lemon
1 tablespoon Husk Hot Sauce (or other hot sauce)
Kosher salt and freshly ground black pepper to taste
2 tablespoons pepper vinegar, preferably Texas Pete brand
Cheeseburgers
One 3-pound fresh boneless chuck roast
12 ounces fresh flank steak
3 ounces bacon, preferably Benton’s
3 tablespoons unsalted butter, at room temperature
10 hamburger buns, preferably potato rolls
1 cup shaved white onion
20 slices American cheese
50 Bread-and-Butter Pickles
For the sauce:
1. Combine all of the ingredients in a large container and stir together to blend well. Cover, and refrigerate. (Tightly covered, the sauce will keep for up to 5 days in the refrigerator.)
For the cheeseburgers:
1. Grind the chuck, flank steak, and bacon through a meat grinder fitted with the large die into a bowl. Mix gently to combine. Then run half of the mixture through the small die. Mix the two together.
2. Portion the meat mixture into twenty 3-ounce patties, about ½ inch thick (each burger gets 2 patties). If not cooking right away, arrange on a baking sheet, cover tightly with plastic wrap, and refrigerate. (The patties can be refrigerated for up to 1 day. Remove from the refrigerator about 30 minutes before you’re ready to cook; it’s important that the patties are not ice-cold when they hit the hot pan.)
3. Generously butter the tops and bottoms of the buns. Toast on a griddle until nice and golden brown. Reserve.
4. Heat two 12-inch cast-iron skillets until as hot as possible. Divide the patties between the two hot pans. When the patties are nice and charred, about 2 minutes, flip them over and cook for 2 minutes more for medium. Place the onion slices on 10 of the patties. Place a slice of the cheese on all of the patties and allow it to melt, about 30 seconds. Stack the non-onion patties on top of the onion patties. Remove from the heat.
5. Smear both sides of the buns with special sauce. Place 5 pickles on the bottom half of each bun. Add the burger patties and top with the top halves of the buns. Serve at once.
Excerpted from Heritage by Sean Brock (Artisan Books). Copyright © 2014.
11:41 PM Admin0
The Famous Husk Cheeseburger Recipe
Photograph by Peter Frank Edwards
Husk Cheeseburger 
Makes 10 cheeseburgers
When I opened Husk, I knew we had to have a cheeseburger on the menu. Everyone has their own idea of the perfect burger; mine was inspired by the drive-in that my family used to take me to when I was young. Robo’s was the only real “restaurant” in my hometown, and my family just loved it. We would go there after my Little League baseball games. As a game wound down, I would be daydreaming about that burger, shake, and crinkle-cut fries. It’s probably the reason for some missed fly balls. 
What I remember most about the cheeseburger was the squishy bun and how wonderful it was to eat the double patty covered in gooey American cheese. This recipe is a tip of the hat to that burger. I’ve changed it a little to make it my own—I wouldn’t dare try and replicate the burger from Robo’s. This recipe feeds a crowd, but you can halve it for a smaller group. 
If you don’t have a meat grinder, ask the butcher to grind the meats for you.
Special Sauce
1¾ cups mayonnaise, preferably Duke’s
1¼ cups yellow mustard
5 tablespoons ketchup
½ cup Bread-and-Butter Pickles, drained and cut into ⅛-inch dice
¼ cup pickled jalapeños, drained and cut into ⅛-inch dice
Grated zest (use a Microplane) and juice of 1 lemon
1 tablespoon Husk Hot Sauce (or other hot sauce)
Kosher salt and freshly ground black pepper to taste
2 tablespoons pepper vinegar, preferably Texas Pete brand
Cheeseburgers
One 3-pound fresh boneless chuck roast
12 ounces fresh flank steak
3 ounces bacon, preferably Benton’s
3 tablespoons unsalted butter, at room temperature
10 hamburger buns, preferably potato rolls
1 cup shaved white onion
20 slices American cheese
50 Bread-and-Butter Pickles
For the sauce:
1. Combine all of the ingredients in a large container and stir together to blend well. Cover, and refrigerate. (Tightly covered, the sauce will keep for up to 5 days in the refrigerator.)
For the cheeseburgers:
1. Grind the chuck, flank steak, and bacon through a meat grinder fitted with the large die into a bowl. Mix gently to combine. Then run half of the mixture through the small die. Mix the two together.
2. Portion the meat mixture into twenty 3-ounce patties, about ½ inch thick (each burger gets 2 patties). If not cooking right away, arrange on a baking sheet, cover tightly with plastic wrap, and refrigerate. (The patties can be refrigerated for up to 1 day. Remove from the refrigerator about 30 minutes before you’re ready to cook; it’s important that the patties are not ice-cold when they hit the hot pan.)
3. Generously butter the tops and bottoms of the buns. Toast on a griddle until nice and golden brown. Reserve.
4. Heat two 12-inch cast-iron skillets until as hot as possible. Divide the patties between the two hot pans. When the patties are nice and charred, about 2 minutes, flip them over and cook for 2 minutes more for medium. Place the onion slices on 10 of the patties. Place a slice of the cheese on all of the patties and allow it to melt, about 30 seconds. Stack the non-onion patties on top of the onion patties. Remove from the heat.
5. Smear both sides of the buns with special sauce. Place 5 pickles on the bottom half of each bun. Add the burger patties and top with the top halves of the buns. Serve at once.
Excerpted from Heritage by Sean Brock (Artisan Books). Copyright © 2014.
pumpkins
Moment Open/Getty Images
1. The Jack-o-Lantern tradition dates back centuries, when people in Ireland decorated turnips and potatoes with scary faces to frighten away a scary character named "Stingy Jack," who, accoring to an old myth, roamed the Earth after his death, as theHistory Channel tells the story. Irish immigrants then brought the practice to the U.S., where it was adapted to the native pumpkins.
2. Pumpkins were first grown in Central America. They’ve grown in North America for 5,000 years, and today, about 95% of the pumpkins processed in the U.S. are grown in Illinois, according to the University of Illinois. Morton, Illinois calls itself the “Pumpkin Capital of the World” (supposedly processing 80% of the world’s canned pumpkin).
3. Though the original Cinderella story dates back to about the 1st century B.C., the detail about thepumpkin turning into a carriage reportedly wasn’t added until 1697, in a French version by Charles Perrault called “Cendrillon.” 

4. One cup of mashed pumpkin contains a whopping 245% of your recommended daily intake of Vitamin A, plus 19% of your Vitamin C and 8 percent of your iron). That’s a veritable superfood (just not in latte form—pumpkin spice lattes typically don’t include actual pumpkins, only the spice mix).

5. When it comes to baking, 2- to 8-pound varieties are your best bets for flavor and density. Save the big ones for carving.

6. The United States produces more than one billion pounds of pumpkins each year.

7. A pumpkin is technically a fruit, and a member of the gourd family. Their botanical name is Cucurbita maxima, C. moschata, C. argyrosperma, and they require 75 to 100 frost-free days to grow, meaning they need to be planted by late May to early July to be ready in time for Halloween.

8. The Guinness World Record for the Heaviest Pumpkin is currently held by Ron Wallace in the United States for his 2,009-pound pumpkin, presented at the New England Giant Pumpkin Weigh-off at Topsfield Fair in Topsfield, Massachusetts in September 2012.

9. The oldest pumpkin seeds date back 8,000 to 10,000 years.

10. According to the American Pie Council (yup, there is such a thing), pumpkin is America’s secondfavorite kind of pie. Nineteen percent report preferring apple pie, compared to 13% for pumpkin.
11:40 PM Admin0
pumpkins
Moment Open/Getty Images
1. The Jack-o-Lantern tradition dates back centuries, when people in Ireland decorated turnips and potatoes with scary faces to frighten away a scary character named "Stingy Jack," who, accoring to an old myth, roamed the Earth after his death, as theHistory Channel tells the story. Irish immigrants then brought the practice to the U.S., where it was adapted to the native pumpkins.
2. Pumpkins were first grown in Central America. They’ve grown in North America for 5,000 years, and today, about 95% of the pumpkins processed in the U.S. are grown in Illinois, according to the University of Illinois. Morton, Illinois calls itself the “Pumpkin Capital of the World” (supposedly processing 80% of the world’s canned pumpkin).
3. Though the original Cinderella story dates back to about the 1st century B.C., the detail about thepumpkin turning into a carriage reportedly wasn’t added until 1697, in a French version by Charles Perrault called “Cendrillon.” 

4. One cup of mashed pumpkin contains a whopping 245% of your recommended daily intake of Vitamin A, plus 19% of your Vitamin C and 8 percent of your iron). That’s a veritable superfood (just not in latte form—pumpkin spice lattes typically don’t include actual pumpkins, only the spice mix).

5. When it comes to baking, 2- to 8-pound varieties are your best bets for flavor and density. Save the big ones for carving.

6. The United States produces more than one billion pounds of pumpkins each year.

7. A pumpkin is technically a fruit, and a member of the gourd family. Their botanical name is Cucurbita maxima, C. moschata, C. argyrosperma, and they require 75 to 100 frost-free days to grow, meaning they need to be planted by late May to early July to be ready in time for Halloween.

8. The Guinness World Record for the Heaviest Pumpkin is currently held by Ron Wallace in the United States for his 2,009-pound pumpkin, presented at the New England Giant Pumpkin Weigh-off at Topsfield Fair in Topsfield, Massachusetts in September 2012.

9. The oldest pumpkin seeds date back 8,000 to 10,000 years.

10. According to the American Pie Council (yup, there is such a thing), pumpkin is America’s secondfavorite kind of pie. Nineteen percent report preferring apple pie, compared to 13% for pumpkin.
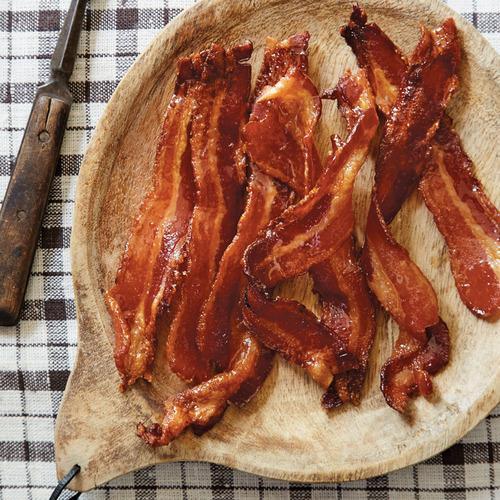
All Southerners dream of coating bacon with bourbon and candied brown sugar, but how many actually achieve this dream? Now everyone can, thanks to Southern Living’s Bourbon & Bacon: The Ultimate Guide to the South’s Favorite Food Groups, by Morgan Murphy, an authority on these regional favorites. Check out this recipe—straight from the book’s pages—and pick up a copy today!
Bourbon Candied Bacon Recipe
Bourbon Candied BaconSavory and sweet, this recipe for Bourbon Candied Bacon will tantalize your taste buds. Master this treat with ease and your friends will start calling you king (or queen) of the hog.
Ingredients12 thick-cut hickory- or applewood-smoked bacon slices
1/2 cup brown sugar
1/4 cup bourbon
Preparation1. Preheat oven to 375°. Arrange bacon in a single layer on a wire rack in an aluminum foil-lined broiler pan. Bake at 375° for 10 minutes or just until bacon begins to curl at ends.
2. Meanwhile, combine brown sugar and bourbon in a small bowl, stirring until sugar dissolves.
3. Remove bacon from oven. Brush both sides of bacon with brown sugar mixture. Bake at 375° for 42 more minutes or until bacon is crisp around edges and browned, brushing both sides of bacon with brown sugar mixture every 10 minutes.
4. Cool completely on a wire rack (about 30 minutes). Bacon will become crisp as it cools.
11:36 PM Admin0
All Southerners dream of coating bacon with bourbon and candied brown sugar, but how many actually achieve this dream? Now everyone can, thanks to Southern Living’s Bourbon & Bacon: The Ultimate Guide to the South’s Favorite Food Groups, by Morgan Murphy, an authority on these regional favorites. Check out this recipe—straight from the book’s pages—and pick up a copy today!
Bourbon Candied Bacon Recipe
Bourbon Candied BaconSavory and sweet, this recipe for Bourbon Candied Bacon will tantalize your taste buds. Master this treat with ease and your friends will start calling you king (or queen) of the hog.
Ingredients12 thick-cut hickory- or applewood-smoked bacon slices
1/2 cup brown sugar
1/4 cup bourbon
Preparation1. Preheat oven to 375°. Arrange bacon in a single layer on a wire rack in an aluminum foil-lined broiler pan. Bake at 375° for 10 minutes or just until bacon begins to curl at ends.
2. Meanwhile, combine brown sugar and bourbon in a small bowl, stirring until sugar dissolves.
3. Remove bacon from oven. Brush both sides of bacon with brown sugar mixture. Bake at 375° for 42 more minutes or until bacon is crisp around edges and browned, brushing both sides of bacon with brown sugar mixture every 10 minutes.
4. Cool completely on a wire rack (about 30 minutes). Bacon will become crisp as it cools.

Tuesday, October 21, 2014


We have our big family Halloween party this weekend and we love making all kinds of fun recipes!  Our seven layer dip is always a party favorite,  so we turned it into a spooky spider web for Halloween!  It's so easy to make and no fail because all you do is assemble it!  Happy Halloween!!
Spooky Halloween 7 Layer Dip Recipe
Ingredients:
16 ounces refried beans
1 1/4 ounces taco seasoning mix (1 packet)
1 cup sour cream (divided)
1 cup salsa
1 cup shredded cheese (I used Colby Jack)
2 tomatoes diced (I used Roma tomatoes)
1/4 cup diced green onions
3 ounces of sliced olives (drained)
1 cup guacamole
11 ounce bag of tortilla chips
Directions:
In a small bowl mix the taco seasoning with the refried beans. Spread the bean mixture evenly on an 11 inch plate getting close to the edge.  Then carefully spread 3/4 cup of the sour cream over the bean mixture.  Then add the salsa very gently over the sour cream.  If your salsa is really runny, drain off some of the liquid first.  Then apply the guacamole mixture over the salsa.  I put dollops of guacamole all over and then carefully spread them together so that the salsa doesn't come through.  Around the edge spread the grated cheese.  top the cheese with sliced olives, diced tomatoes, and sliced green onions. With the remaining 1/4 cup of sour cream, put it into a sandwich bag and clip off the corner. Squeeze the sour cream into a web pattern over the guacamole.  Top with plastic spiders.
**Be careful not to eat the plastic spiders, one of our sisters did!!! :)  Right Camille?!
Here's the video showing another way to make the dip:


11:43 PM Admin0

We have our big family Halloween party this weekend and we love making all kinds of fun recipes!  Our seven layer dip is always a party favorite,  so we turned it into a spooky spider web for Halloween!  It's so easy to make and no fail because all you do is assemble it!  Happy Halloween!!
Spooky Halloween 7 Layer Dip Recipe
Ingredients:
16 ounces refried beans
1 1/4 ounces taco seasoning mix (1 packet)
1 cup sour cream (divided)
1 cup salsa
1 cup shredded cheese (I used Colby Jack)
2 tomatoes diced (I used Roma tomatoes)
1/4 cup diced green onions
3 ounces of sliced olives (drained)
1 cup guacamole
11 ounce bag of tortilla chips
Directions:
In a small bowl mix the taco seasoning with the refried beans. Spread the bean mixture evenly on an 11 inch plate getting close to the edge.  Then carefully spread 3/4 cup of the sour cream over the bean mixture.  Then add the salsa very gently over the sour cream.  If your salsa is really runny, drain off some of the liquid first.  Then apply the guacamole mixture over the salsa.  I put dollops of guacamole all over and then carefully spread them together so that the salsa doesn't come through.  Around the edge spread the grated cheese.  top the cheese with sliced olives, diced tomatoes, and sliced green onions. With the remaining 1/4 cup of sour cream, put it into a sandwich bag and clip off the corner. Squeeze the sour cream into a web pattern over the guacamole.  Top with plastic spiders.
**Be careful not to eat the plastic spiders, one of our sisters did!!! :)  Right Camille?!
Here's the video showing another way to make the dip:


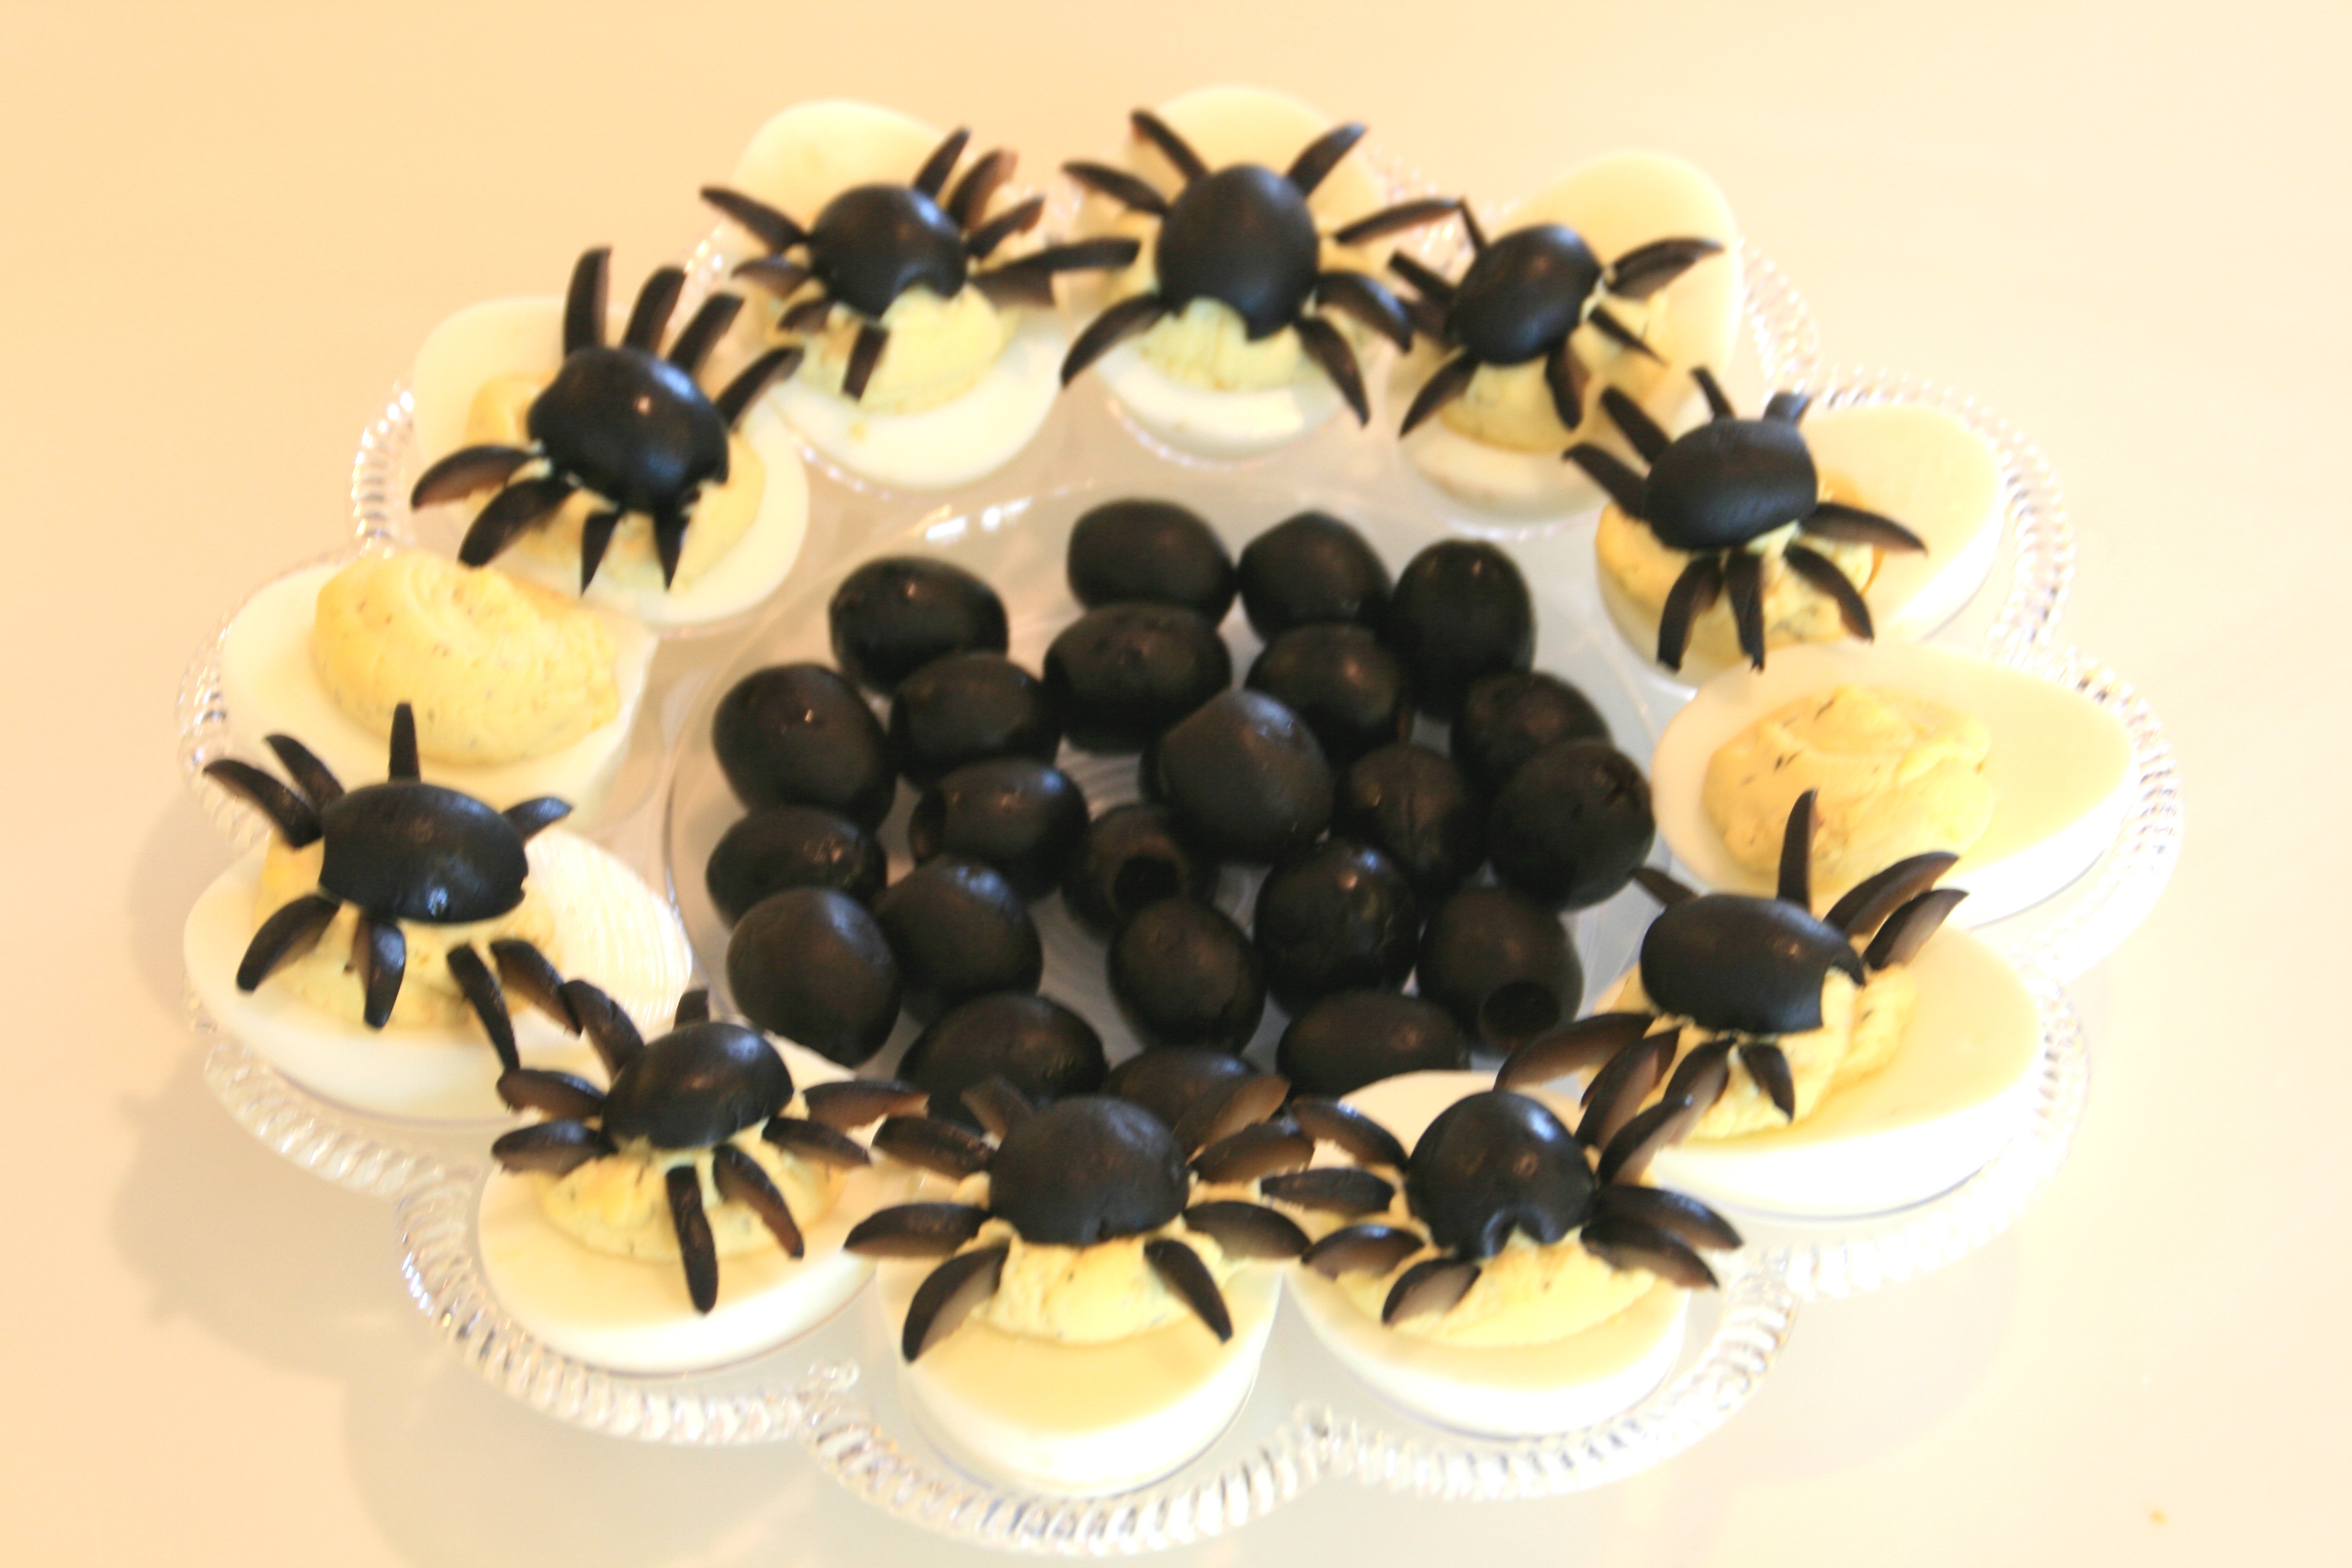
Halloween Deviled Spider Eggs on Shockingly Delicious
If the question is what should you bring to the office or the party for Halloween, the answer is Halloween Deviled Spider Eggs!
Deviled eggs always disappear first from the appetizer plate, and this decorated version just makes people laugh. Or else it gives them a creepy shiver, which is also worth a chuckle.
Amusement with your food is always a good thing.
Halloween Deviled Spider Eggs
You could pile a bunch of extra olives in the center of the plate

Directions are simple

1. Make your favorite deviled eggs. Here’s a quick tutorial on the easiest, best way to hard cook an egg.2. Decorate with olives to resemble spiders!3. Voila!
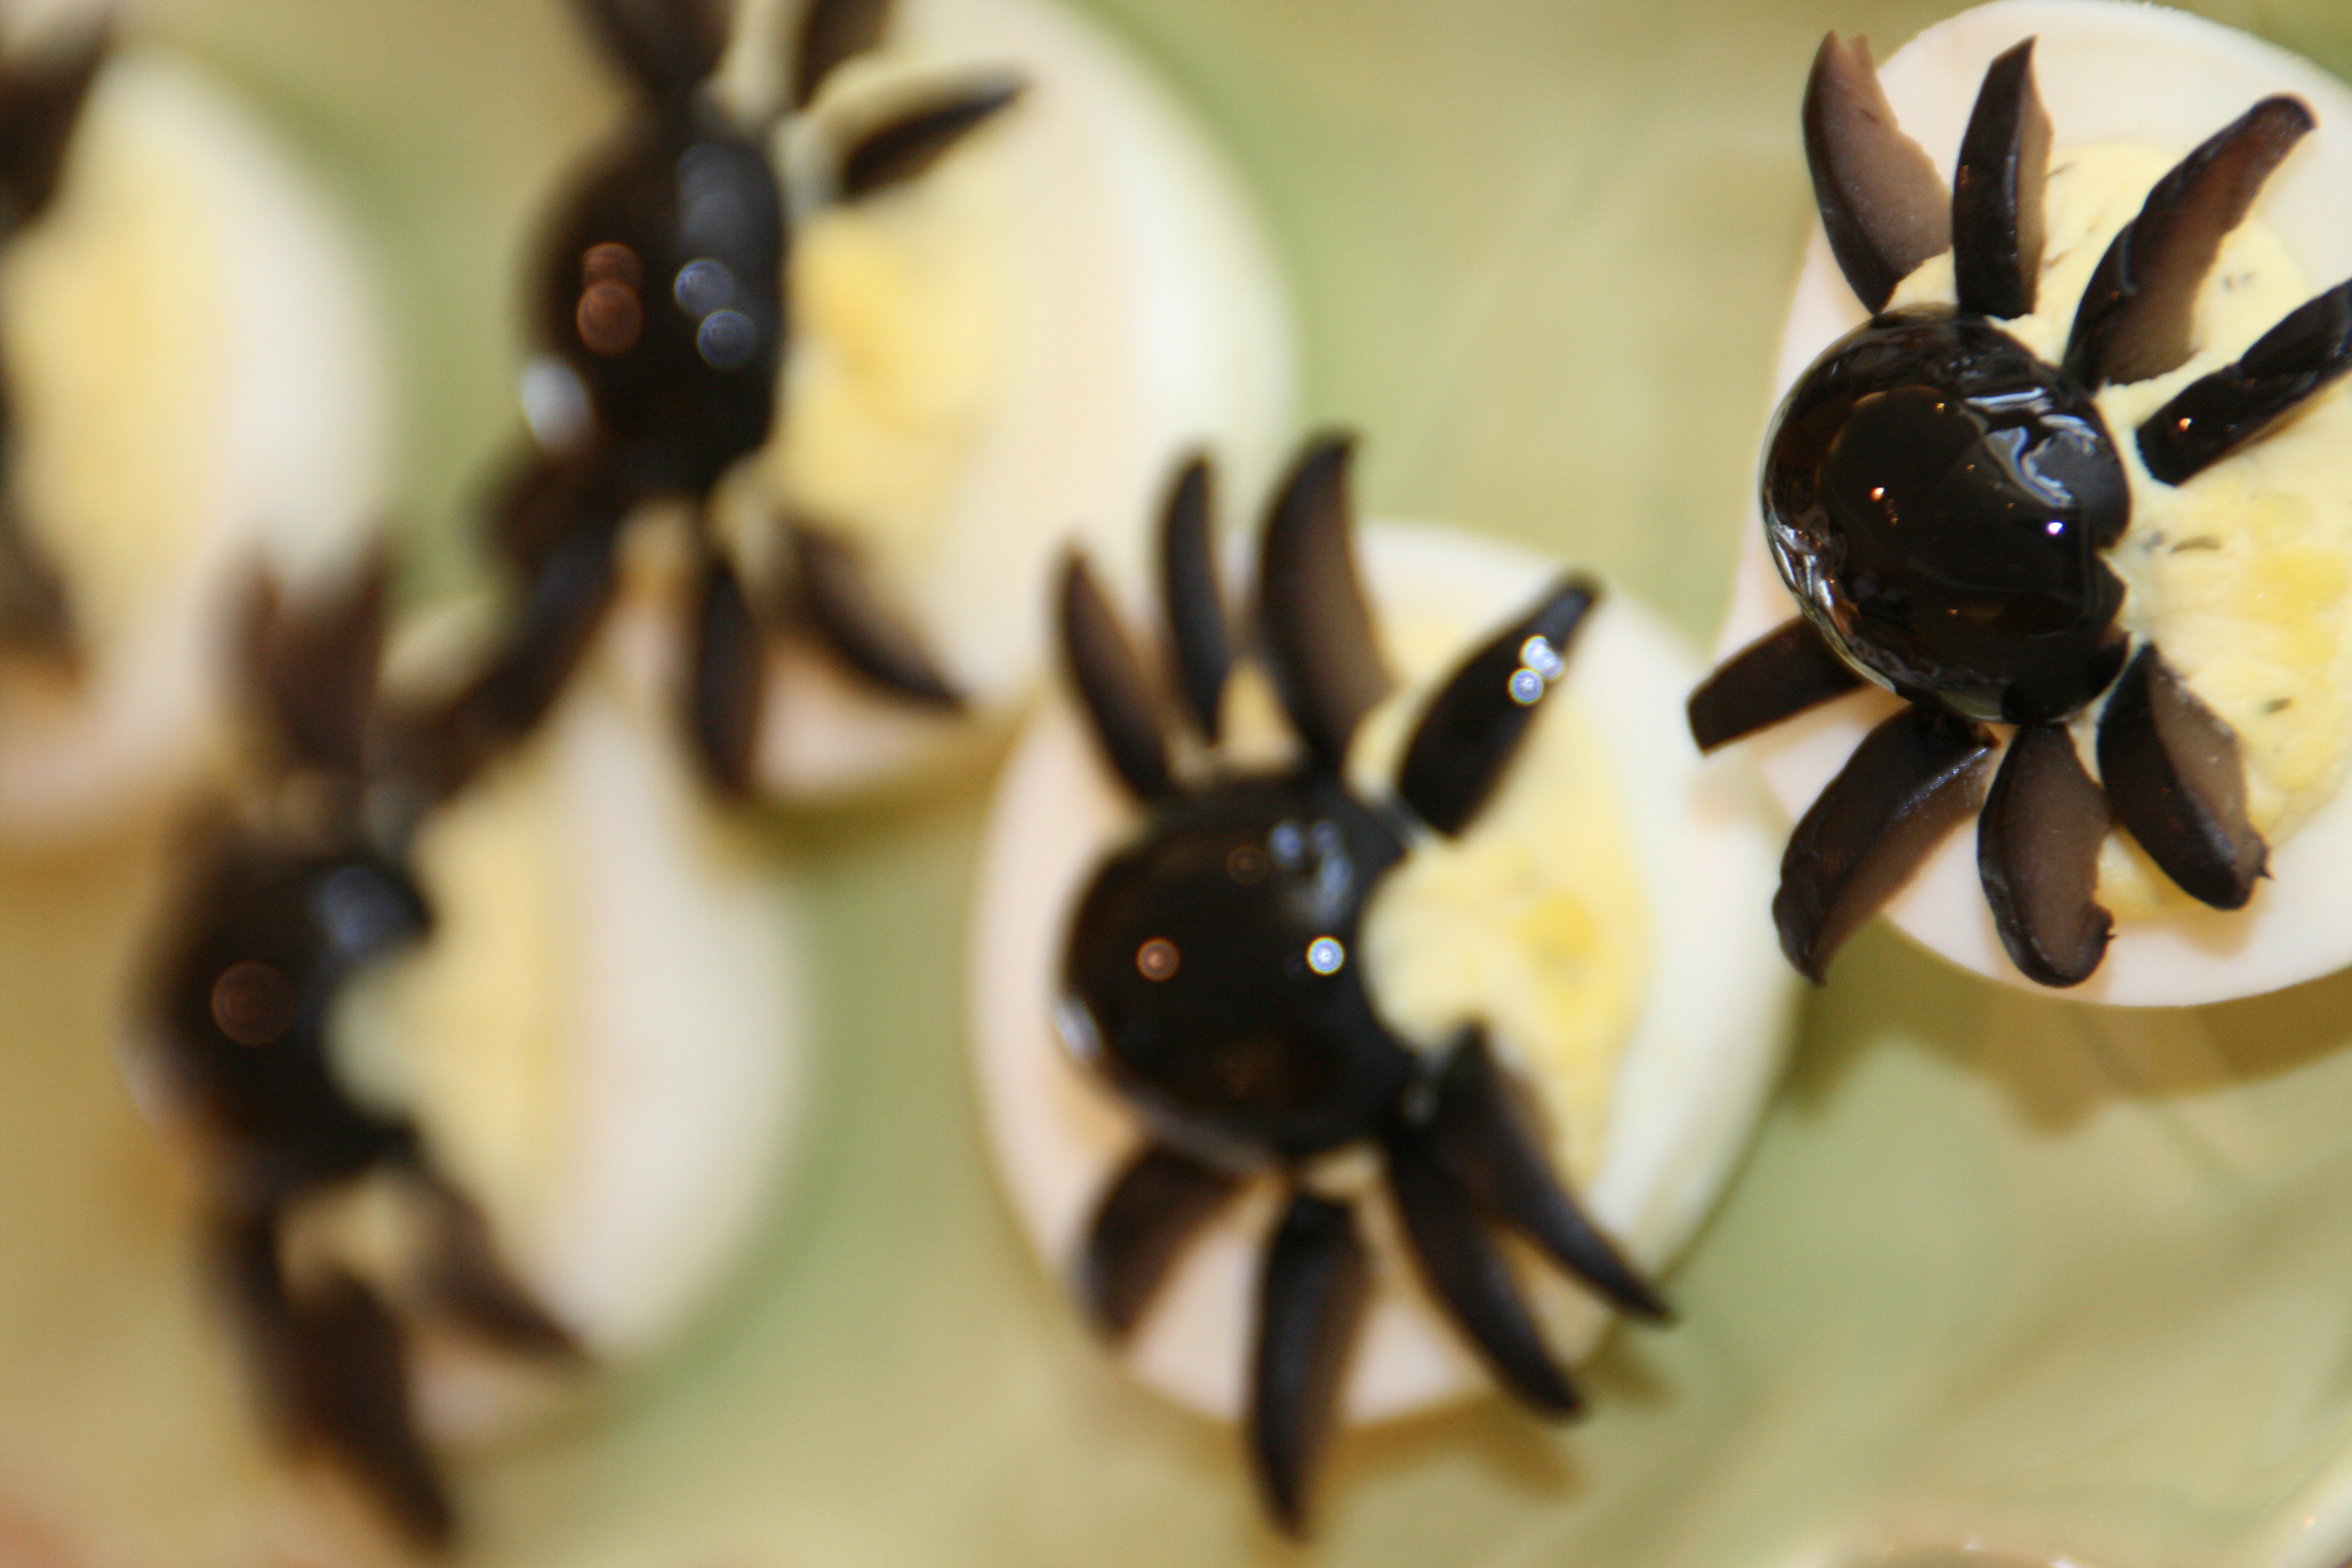
Halloween Deviled Spider Eggs
A green plate is also a nice contrast color

A couple of hints on how to do the spiders

1. You will need 1 whole pitted black olive per egg. You can use a regular (boring) black olive, or a more interesting Kalamata olive.  Buy them pitted, because if you try to pit them yourself, you will mangle the olive, and for this recipe, you need pretty darn nice looking olives. (Second thought: Use the regular olives for a kid platter, and Kalamata olives for an adult platter. Everyone’s happy.)
2. Cut the olive in half lengthwise. Place half on the egg as the spider body. 
3. Cut the remaining half into 2 vertical pieces. Cut each piece into 4 vertical slices, so you will have 8 legs. Spiders have 8 legs. If you cut each piece into 3 pieces instead of 4, you will have  a 6-legged insect, but it won’t be an arachnid. So cut 8 legs and quit arguing with me.
4. Poke legs into the egg filling to adhere them. You don’t want any legs falling off (see #3 above).
5. Voila! Spider Eggs are served! 
6. Stand around smugly as everyone murmers about how clever you are.
Halloween Deviled Spider Eggs
It helps if you have a cute boy serving the eggs, too!

source : http://www.shockinglydelicious.com/halloween-deviled-spider-eggs/
11:25 PM Admin0

Halloween Deviled Spider Eggs on Shockingly Delicious
If the question is what should you bring to the office or the party for Halloween, the answer is Halloween Deviled Spider Eggs!
Deviled eggs always disappear first from the appetizer plate, and this decorated version just makes people laugh. Or else it gives them a creepy shiver, which is also worth a chuckle.
Amusement with your food is always a good thing.
Halloween Deviled Spider Eggs
You could pile a bunch of extra olives in the center of the plate

Directions are simple

1. Make your favorite deviled eggs. Here’s a quick tutorial on the easiest, best way to hard cook an egg.2. Decorate with olives to resemble spiders!3. Voila!
Halloween Deviled Spider Eggs
A green plate is also a nice contrast color

A couple of hints on how to do the spiders

1. You will need 1 whole pitted black olive per egg. You can use a regular (boring) black olive, or a more interesting Kalamata olive.  Buy them pitted, because if you try to pit them yourself, you will mangle the olive, and for this recipe, you need pretty darn nice looking olives. (Second thought: Use the regular olives for a kid platter, and Kalamata olives for an adult platter. Everyone’s happy.)
2. Cut the olive in half lengthwise. Place half on the egg as the spider body. 
3. Cut the remaining half into 2 vertical pieces. Cut each piece into 4 vertical slices, so you will have 8 legs. Spiders have 8 legs. If you cut each piece into 3 pieces instead of 4, you will have  a 6-legged insect, but it won’t be an arachnid. So cut 8 legs and quit arguing with me.
4. Poke legs into the egg filling to adhere them. You don’t want any legs falling off (see #3 above).
5. Voila! Spider Eggs are served! 
6. Stand around smugly as everyone murmers about how clever you are.
Halloween Deviled Spider Eggs
It helps if you have a cute boy serving the eggs, too!

source : http://www.shockinglydelicious.com/halloween-deviled-spider-eggs/
chickpea quinoa pepper jacks

Cheesy Jalapeno Pepper Jacks

This recipe uses one full can of chickpeas, divided between the filling and the chickpea cheese.
YIELD: two pepper jacks
DIETARY TYPE: dairy, egg, soy, oil and gluten free, vegan
INGREDIENTS FOR PEPPER JACKS:
2 large orange bell peppers*
1/2 cup chickpeas, peeled
3/4 cup cooked quinoa
1 fresh jalapeno, seeded and diced
1/2 to 3/4 cup chickpea cheese sauce (recipe follows)
1/3 cup Erewhon Quinoa Chia cereal, crushed
1 tablespoon nutritional yeast
*if carving pepper jacks, select bell peppers that stand upright
INGREDIENTS FOR CHICKPEA CHEESE SAUCE:
3/4 cup chickpeas, peeled
1/3 cup nutritional yeast
1/3 – 2/3 cup vegetable broth*
1 tablespoon tamari
1 clove garlic, minced
1 tablespoon onion powder
sea salt and pepper
*adjust amount for thinner/thicker sauce consistency

INSTRUCTIONS
Make the Pepper JacksCut the top off each bell pepper. Remove seeds and innards. On the best (flattest) side, carefully carve a jack o lantern face in each pepper, then set aside. Combine 1/2 cup chickpeas with cooked quinoa, diced jalapenos and chickpea cheese sauce. Fill each pepper with chickpea quinoa mixture. Combine crushed cereal and nutritional yeast. Top each pepper with this crumble mixture.
Bake at 300 degrees until cooked through, about 30 minutes.

Make the Chickpea Cheese Sauce
Peel chickpeas. In food processor, combine chickpeas, nutritional yeast and vegetable broth – process. Add tamari, garlic, onion powder, salt and pepper – continue to process until completely smooth.
11:17 PM Admin0
chickpea quinoa pepper jacks

Cheesy Jalapeno Pepper Jacks

This recipe uses one full can of chickpeas, divided between the filling and the chickpea cheese.
YIELD: two pepper jacks
DIETARY TYPE: dairy, egg, soy, oil and gluten free, vegan
INGREDIENTS FOR PEPPER JACKS:
2 large orange bell peppers*
1/2 cup chickpeas, peeled
3/4 cup cooked quinoa
1 fresh jalapeno, seeded and diced
1/2 to 3/4 cup chickpea cheese sauce (recipe follows)
1/3 cup Erewhon Quinoa Chia cereal, crushed
1 tablespoon nutritional yeast
*if carving pepper jacks, select bell peppers that stand upright
INGREDIENTS FOR CHICKPEA CHEESE SAUCE:
3/4 cup chickpeas, peeled
1/3 cup nutritional yeast
1/3 – 2/3 cup vegetable broth*
1 tablespoon tamari
1 clove garlic, minced
1 tablespoon onion powder
sea salt and pepper
*adjust amount for thinner/thicker sauce consistency

INSTRUCTIONS
Make the Pepper JacksCut the top off each bell pepper. Remove seeds and innards. On the best (flattest) side, carefully carve a jack o lantern face in each pepper, then set aside. Combine 1/2 cup chickpeas with cooked quinoa, diced jalapenos and chickpea cheese sauce. Fill each pepper with chickpea quinoa mixture. Combine crushed cereal and nutritional yeast. Top each pepper with this crumble mixture.
Bake at 300 degrees until cooked through, about 30 minutes.

Make the Chickpea Cheese Sauce
Peel chickpeas. In food processor, combine chickpeas, nutritional yeast and vegetable broth – process. Add tamari, garlic, onion powder, salt and pepper – continue to process until completely smooth.