Monday, October 27, 2014

Recipe: Candy-Topped Chocolate Cupcakes

DESSERT RECIPES FROM THE KITCHN
Pin it button big
When it comes to Halloween, I don't joke around with my treats, and these cupcakes are no exception. It is a holiday that revolves around getting candy, after all!
With a classic chocolate cake base and mounds of fluffy frosting, these cupcakes are super festive and easily customizable. Grab some friends, your favorite candy, and make a batch of these treats.
Pin it button big
These cupcakes start with an easy chocolate cake recipe and quick meringue frosting. I actually used The Kitchn's Chocolate Layer Cake recipe because it's such a good all-purpose cake base, and just made a few little tweaks to make it cupcake-friendly. For the meringue frosting, I substituted brown sugar for regular sugar to create a richer, nougat-like flavor to stick with our candy theme! Since the frosting is on the lighter, not-so-sweet side, feel free to pipe on some sky-high swirls.
Finally, just to gild the lily a bit, each cupcake is also filled with a creamy peanut butter filling in a nod to peanut butter cups. You can skip this if your favorite candy doesn't go with peanut butter, or go wild and substitute Nutella or another favorite spread!
Pin it button big
So far, these cupcakes already reflect all the best elements from classic candy bars and beloved Halloween treats. Now, here comes the fun part: sprinkle the frosting with your favorite candy toppings! Try roasted peanuts, crumbled candies, chopped candy bars, or candy-covered chocolates. You can even swirl on some caramel sauce or create a peanut butter drizzle.
Pin it button big

Candy-Topped Chocolate Cupcakes

Makes 24 cupcakes
For the chocolate cupcakes (adapted from this recipe):2 cups granulated sugar
2 1/2 cups all-purpose flour
1 cup cocoa powder
1 1/2 teaspoons baking powder
1 1/2 teaspoons baking soda
1 teaspoon salt
2 large eggs
1 large egg yolk
1 1/4 cups whole milk
1/2 cup vegetable oil
2 teaspoons vanilla
1 cup boiling water
For the peanut butter filling:
1/2 cup unsalted butter, softened
1 cup creamy peanut butter
1 1/2 cups powdered sugar
1 teaspoon vanilla extract
1/8 teaspoon salt
For the brown sugar meringue frosting:6 large egg whites (see Recipe Note)
2 1/4 cups brown sugar, packed
1 teaspoon vanilla extract
To finish: crushed or crumbled candy toppings of your choice
Make the cupcakes: Pre-heat oven to 350°F. Line a cupcake tin (or tins) with 24 paper liners and set aside.
Stir together the sugar, flour, cocoa powder, baking powder, baking soda, and salt in a large mixing bowl or the bowl of a stand mixer. Add in the eggs, milk, oil, and vanilla. Beat at medium speed for 2 minutes. Stir in the boiling water until combined.
Divide the batter evenly between the cupcake liners, filling them no more than 2/3 of the way full. Bake for 22 to 24 minutes, or until a wooden toothpick inserted into the center of a cupcake comes out clean. Transfer from the tins to a cooling rack and cool completely before frosting.
Make the peanut butter filling: Beat together the butter and peanut butter with a mixer on medium until combined. Gradually add in the powdered sugar, vanilla, and salt. Mix until creamy.
Make the meringue frosting: Place the egg whites and brown sugar in the bowl of a stand mixer. Whisk to just combine. Fill a saucepan with a couple inches of water and heat over medium. Place the mixing bowl on top of the saucepan to create a double-boiler. Heat the egg white mixture until warm and the sugar is completely dissolved.
Once warmed, return the mixing bowl to the mixer. Whisk the mixture at high speed until medium-stiff peaks are formed, or until the outside of the bowl reaches room temperature. Beat in the vanilla at the end.
Assemble the cupcakes: Once cupcakes are cooled, use an apple corer or paring knife to remove the centers of each cupcake. Fill the cupcakes with the peanut butter filling.
Place the frosting in a pasty bag fitted with a star piping tip. Swirl frosting on top of each cupcake. To finish, sprinkle the cupcakes with whatever candy bar toppings you'd like.

Recipe Notes

  • Note on Raw Egg Whites: This recipe uses raw egg whites. If you are cooking for people who should not consume raw egg whites, substitute pasteurized egg whites, which are available in cartons in the refrigerator section of most grocery stores.
  • Using leftover peanut butter filling: You can thin out any remaining peanut butter filling with heavy cream and corn syrup to create a peanut butter glaze. Try adding in a teaspoon of each until desired consistency is reached. You can drizzle this over the cupcakes as well.
    Pin it button big
    (Image credits: Tessa Huff)
    10:51 PM Admin0

    Recipe: Candy-Topped Chocolate Cupcakes

    DESSERT RECIPES FROM THE KITCHN
    Pin it button big
    When it comes to Halloween, I don't joke around with my treats, and these cupcakes are no exception. It is a holiday that revolves around getting candy, after all!
    With a classic chocolate cake base and mounds of fluffy frosting, these cupcakes are super festive and easily customizable. Grab some friends, your favorite candy, and make a batch of these treats.
    Pin it button big
    These cupcakes start with an easy chocolate cake recipe and quick meringue frosting. I actually used The Kitchn's Chocolate Layer Cake recipe because it's such a good all-purpose cake base, and just made a few little tweaks to make it cupcake-friendly. For the meringue frosting, I substituted brown sugar for regular sugar to create a richer, nougat-like flavor to stick with our candy theme! Since the frosting is on the lighter, not-so-sweet side, feel free to pipe on some sky-high swirls.
    Finally, just to gild the lily a bit, each cupcake is also filled with a creamy peanut butter filling in a nod to peanut butter cups. You can skip this if your favorite candy doesn't go with peanut butter, or go wild and substitute Nutella or another favorite spread!
    Pin it button big
    So far, these cupcakes already reflect all the best elements from classic candy bars and beloved Halloween treats. Now, here comes the fun part: sprinkle the frosting with your favorite candy toppings! Try roasted peanuts, crumbled candies, chopped candy bars, or candy-covered chocolates. You can even swirl on some caramel sauce or create a peanut butter drizzle.
    Pin it button big

    Candy-Topped Chocolate Cupcakes

    Makes 24 cupcakes
    For the chocolate cupcakes (adapted from this recipe):2 cups granulated sugar
    2 1/2 cups all-purpose flour
    1 cup cocoa powder
    1 1/2 teaspoons baking powder
    1 1/2 teaspoons baking soda
    1 teaspoon salt
    2 large eggs
    1 large egg yolk
    1 1/4 cups whole milk
    1/2 cup vegetable oil
    2 teaspoons vanilla
    1 cup boiling water
    For the peanut butter filling:
    1/2 cup unsalted butter, softened
    1 cup creamy peanut butter
    1 1/2 cups powdered sugar
    1 teaspoon vanilla extract
    1/8 teaspoon salt
    For the brown sugar meringue frosting:6 large egg whites (see Recipe Note)
    2 1/4 cups brown sugar, packed
    1 teaspoon vanilla extract
    To finish: crushed or crumbled candy toppings of your choice
    Make the cupcakes: Pre-heat oven to 350°F. Line a cupcake tin (or tins) with 24 paper liners and set aside.
    Stir together the sugar, flour, cocoa powder, baking powder, baking soda, and salt in a large mixing bowl or the bowl of a stand mixer. Add in the eggs, milk, oil, and vanilla. Beat at medium speed for 2 minutes. Stir in the boiling water until combined.
    Divide the batter evenly between the cupcake liners, filling them no more than 2/3 of the way full. Bake for 22 to 24 minutes, or until a wooden toothpick inserted into the center of a cupcake comes out clean. Transfer from the tins to a cooling rack and cool completely before frosting.
    Make the peanut butter filling: Beat together the butter and peanut butter with a mixer on medium until combined. Gradually add in the powdered sugar, vanilla, and salt. Mix until creamy.
    Make the meringue frosting: Place the egg whites and brown sugar in the bowl of a stand mixer. Whisk to just combine. Fill a saucepan with a couple inches of water and heat over medium. Place the mixing bowl on top of the saucepan to create a double-boiler. Heat the egg white mixture until warm and the sugar is completely dissolved.
    Once warmed, return the mixing bowl to the mixer. Whisk the mixture at high speed until medium-stiff peaks are formed, or until the outside of the bowl reaches room temperature. Beat in the vanilla at the end.
    Assemble the cupcakes: Once cupcakes are cooled, use an apple corer or paring knife to remove the centers of each cupcake. Fill the cupcakes with the peanut butter filling.
    Place the frosting in a pasty bag fitted with a star piping tip. Swirl frosting on top of each cupcake. To finish, sprinkle the cupcakes with whatever candy bar toppings you'd like.

    Recipe Notes

    • Note on Raw Egg Whites: This recipe uses raw egg whites. If you are cooking for people who should not consume raw egg whites, substitute pasteurized egg whites, which are available in cartons in the refrigerator section of most grocery stores.
    • Using leftover peanut butter filling: You can thin out any remaining peanut butter filling with heavy cream and corn syrup to create a peanut butter glaze. Try adding in a teaspoon of each until desired consistency is reached. You can drizzle this over the cupcakes as well.
      Pin it button big
      (Image credits: Tessa Huff)
      Classic Light Lasagna #recipe - RecipeGirl.com

      Yield: 8 servings

      Prep Time: 40 min
      Cook Time: 1 hour 10 min

      Ingredients:

      1 1/2 cups coarsely chopped onion
      3/4 cup coarsely chopped celery
      1/2 cup coarsely chopped carrot
      4 garlic cloves, peeled
      1 tablespoon olive oil
      1 tablespoon unsalted tomato paste
      1 ounce diced pancetta
      1 pound ground turkey breast
      1/4 cup white wine
      3/4 teaspoon kosher salt
      3/4 teaspoon crushed red pepper
      1/2 teaspoon dried oregano
      1/2 teaspoon freshly ground black pepper
      1 cup 1% low-fat milk
      1/2 cup chopped fresh basil
      One 28-ounce can crushed tomatoes, undrained
      cooking spray
      1 1/2 cups part-skim ricotta cheese
      6 ounces shredded part-skim mozzarella cheese, divided (1 1/2 cups)
      1 large egg, lightly beaten
      6 cooked lasagna noodles

      Directions:

      1. Prepare the sauce: Place onion, celery, carrot and garlic in a food processor; pulse until coarsely ground. Heat a medium saucepan over medium-high heat. Add oil to the pan; swirl to coat. Add tomato paste and pancetta; cook 1 minute, stirring constantly. Add turkey, and cook 4 minutes, stirring to crumble. Add wine; cook 2 minutes or until liquid evaporates, scraping pan to loosen browned bits. Add onion mixture, salt, red pepper, oregano and black pepper to the pan, and cook 3 minutes, stirring occasionally. Add milk and basil; cook 3 minutes, stirring occasionally. Stir in tomatoes; reduce heat, and simmer 20 minutes.
      2. Preheat oven to 425 degrees F. Spray a 13x9-inch glass or ceramic baking dish with nonstick spray.
      3. Prepare the filling: In a medium bowl, combine the ricotta, mozzarella and egg.
      4. Assemble the lasagna: Spread 3/4 cup of the sauce in the bottom of the prepared dish. Arrange 3 noodles over the sauce; top with half of the remaining sauce and half of the ricotta mixture (I spooned it on and gently spread it over the noodles). Repeat layers once, ending with the ricotta mixture. Sprinkle remaining 1/2 cup mozzarella evenly over the top.
      5. Bake for 35 minutes. If your cheese is not golden brown already, you can preheat the broiler and broil the lasagna for 2 minutes (mine was already toasted, so I skipped this step). Let stand for 10 minutes before serving.

      Nutritional Information per serving:
      Serving size: 1/8th of the recipe
      Calories per serving: 364
      Fat per serving: 13.2g
      Saturated Fat per serving: 6g
      Sodium per serving: 644mg
      Fiber per serving: 3.8g
      Protein per serving: 30.9g
      Cholesterol per serving: 75mg
      Carbohydrates per serving: 31.4g
      WW POINTS per serving:
      Points Plus Program: 9 Old Points Program: 8

      10:49 PM Admin0
      Classic Light Lasagna #recipe - RecipeGirl.com

      Yield: 8 servings

      Prep Time: 40 min
      Cook Time: 1 hour 10 min

      Ingredients:

      1 1/2 cups coarsely chopped onion
      3/4 cup coarsely chopped celery
      1/2 cup coarsely chopped carrot
      4 garlic cloves, peeled
      1 tablespoon olive oil
      1 tablespoon unsalted tomato paste
      1 ounce diced pancetta
      1 pound ground turkey breast
      1/4 cup white wine
      3/4 teaspoon kosher salt
      3/4 teaspoon crushed red pepper
      1/2 teaspoon dried oregano
      1/2 teaspoon freshly ground black pepper
      1 cup 1% low-fat milk
      1/2 cup chopped fresh basil
      One 28-ounce can crushed tomatoes, undrained
      cooking spray
      1 1/2 cups part-skim ricotta cheese
      6 ounces shredded part-skim mozzarella cheese, divided (1 1/2 cups)
      1 large egg, lightly beaten
      6 cooked lasagna noodles

      Directions:

      1. Prepare the sauce: Place onion, celery, carrot and garlic in a food processor; pulse until coarsely ground. Heat a medium saucepan over medium-high heat. Add oil to the pan; swirl to coat. Add tomato paste and pancetta; cook 1 minute, stirring constantly. Add turkey, and cook 4 minutes, stirring to crumble. Add wine; cook 2 minutes or until liquid evaporates, scraping pan to loosen browned bits. Add onion mixture, salt, red pepper, oregano and black pepper to the pan, and cook 3 minutes, stirring occasionally. Add milk and basil; cook 3 minutes, stirring occasionally. Stir in tomatoes; reduce heat, and simmer 20 minutes.
      2. Preheat oven to 425 degrees F. Spray a 13x9-inch glass or ceramic baking dish with nonstick spray.
      3. Prepare the filling: In a medium bowl, combine the ricotta, mozzarella and egg.
      4. Assemble the lasagna: Spread 3/4 cup of the sauce in the bottom of the prepared dish. Arrange 3 noodles over the sauce; top with half of the remaining sauce and half of the ricotta mixture (I spooned it on and gently spread it over the noodles). Repeat layers once, ending with the ricotta mixture. Sprinkle remaining 1/2 cup mozzarella evenly over the top.
      5. Bake for 35 minutes. If your cheese is not golden brown already, you can preheat the broiler and broil the lasagna for 2 minutes (mine was already toasted, so I skipped this step). Let stand for 10 minutes before serving.

      Nutritional Information per serving:
      Serving size: 1/8th of the recipe
      Calories per serving: 364
      Fat per serving: 13.2g
      Saturated Fat per serving: 6g
      Sodium per serving: 644mg
      Fiber per serving: 3.8g
      Protein per serving: 30.9g
      Cholesterol per serving: 75mg
      Carbohydrates per serving: 31.4g
      WW POINTS per serving:
      Points Plus Program: 9 Old Points Program: 8


      chicken-pot-pie-recipe
      Gina Neely opens up about her recent separation from her husband, Pat and teaches us how to make her quick and easy chicken pot pie!

      Ingredients
      1 (10.2 oz) can
      Pillsbury Grands Homestyle Buttermilk Biscuits (5 count)
      1 (12 oz) package
      Green Giant Steamers broccoli, carrots, cauliflower and cheese sauce
      2 cups cooked
      chicken, chopped
      2 tablespoons chicken
      broth
      1/4 cup shredded
      Parmesan cheese
      Directions:
      1. Heat oven to 375° F. Microwave vegetables as directed on package.
      2. Meanwhile, roll out each biscuit into a 5-inch circle. Press one biscuit into each cup of a 6 cup jumbo muffin pan
      overlapping top edge of pan.
      3. Divide chicken evenly into biscuit-lined cups. Top each until vegetable mixture.
      Sprinkle each with Parmesan cheese.
      4. Bake for 12 to 15 minutes or until golden brown. Loosen edges with metal spatula to remove pot pies from pan.
      5 servings
      Prep Time: 5 Min
      Start to Finish: 20 Min
      Tip: Serve pot pies with a fresh, green salad and a side of fruit to complete your family
      meal. Don’t have leftover chicken? Precooked rotisserie chicken is readily available in the deli section of grocery stores, and adds to the ease of this meal. Don’t have a jumbo muffin tin? Use individual ramekins instead.
      This family friendly favorite is made quick and easy with the use of frozen vegetables. Lots of flavor and
      little effort!
      10:47 PM Admin0


      chicken-pot-pie-recipe
      Gina Neely opens up about her recent separation from her husband, Pat and teaches us how to make her quick and easy chicken pot pie!

      Ingredients
      1 (10.2 oz) can
      Pillsbury Grands Homestyle Buttermilk Biscuits (5 count)
      1 (12 oz) package
      Green Giant Steamers broccoli, carrots, cauliflower and cheese sauce
      2 cups cooked
      chicken, chopped
      2 tablespoons chicken
      broth
      1/4 cup shredded
      Parmesan cheese
      Directions:
      1. Heat oven to 375° F. Microwave vegetables as directed on package.
      2. Meanwhile, roll out each biscuit into a 5-inch circle. Press one biscuit into each cup of a 6 cup jumbo muffin pan
      overlapping top edge of pan.
      3. Divide chicken evenly into biscuit-lined cups. Top each until vegetable mixture.
      Sprinkle each with Parmesan cheese.
      4. Bake for 12 to 15 minutes or until golden brown. Loosen edges with metal spatula to remove pot pies from pan.
      5 servings
      Prep Time: 5 Min
      Start to Finish: 20 Min
      Tip: Serve pot pies with a fresh, green salad and a side of fruit to complete your family
      meal. Don’t have leftover chicken? Precooked rotisserie chicken is readily available in the deli section of grocery stores, and adds to the ease of this meal. Don’t have a jumbo muffin tin? Use individual ramekins instead.
      This family friendly favorite is made quick and easy with the use of frozen vegetables. Lots of flavor and
      little effort!

      Friday, October 24, 2014

      Chocolate Pumpkin Cut Out Cookies decorated like Mummys for Halloween @createdbydiane
      Ingredients
      • 1 cup butter
      • 1 cup brown sugar
      • 1 egg
      • ½ teaspoon pumpkin spice baking emulsion (I used Loranns)
      • 1 teaspoon vanilla extract
      • ¼ cup melted and cooled 60% cacao Ghiradelli Chips
      • 2 tablespoons unsweetened cocoa (dutch process)
      • 2 teaspoons pumpkin pie spice
      • 3 cups flour
      • 2 teaspoons baking powder
      • 1 teaspoon salt
      Instructions
      1. Preheat oven to 400 degrees.
      2. In mixer with bowl, beat butter and sugar
      3. Add egg, pumpkin emulsion, vanilla, melted and cooled chocolate, cocoa and pumpkin spice, mix well.
      4. Add in flour, baking powder, salt and blend until all combined.
      5. Roll out cookies in between wax paper or lightly floured work surface to ¼ inch thick and cut with cookie cutter.
      6. Place cookies onto parchment lined baking sheets and bake for 7-9 minutes or until edges are firm.
      7. Remove cookies from baking sheets when they are cooled.
      8. !Royal Icing Recipe
      9. I piped the eyes on with a #2 tip on the whites of the eyes and a #1 with the black.
      10. I used a #264 tip for the white mummy stripes, alternatively you can use a #5 pinched into an oval if needed.

      11:22 PM Admin0
      Chocolate Pumpkin Cut Out Cookies decorated like Mummys for Halloween @createdbydiane
      Ingredients
      • 1 cup butter
      • 1 cup brown sugar
      • 1 egg
      • ½ teaspoon pumpkin spice baking emulsion (I used Loranns)
      • 1 teaspoon vanilla extract
      • ¼ cup melted and cooled 60% cacao Ghiradelli Chips
      • 2 tablespoons unsweetened cocoa (dutch process)
      • 2 teaspoons pumpkin pie spice
      • 3 cups flour
      • 2 teaspoons baking powder
      • 1 teaspoon salt
      Instructions
      1. Preheat oven to 400 degrees.
      2. In mixer with bowl, beat butter and sugar
      3. Add egg, pumpkin emulsion, vanilla, melted and cooled chocolate, cocoa and pumpkin spice, mix well.
      4. Add in flour, baking powder, salt and blend until all combined.
      5. Roll out cookies in between wax paper or lightly floured work surface to ¼ inch thick and cut with cookie cutter.
      6. Place cookies onto parchment lined baking sheets and bake for 7-9 minutes or until edges are firm.
      7. Remove cookies from baking sheets when they are cooled.
      8. !Royal Icing Recipe
      9. I piped the eyes on with a #2 tip on the whites of the eyes and a #1 with the black.
      10. I used a #264 tip for the white mummy stripes, alternatively you can use a #5 pinched into an oval if needed.

      I love chocolate covered strawberries!  Eating them makes me feel pampered… or somehow like it is a special occasion.  Plus, they are the quickest dessert, and they are always a hit. Whenever I make them, people get excited.  And I’m talking big people, little people, and somewhere-in-between people .  Everyone.  So I thought why not for Halloween?  And I’m glad I did.  These ghost and mummy strawberries turned out darling!  I used an edible ink pen (I bought mine on Amazon- I included the link for you below, but I’ve seen them in the cake decorating section of Walmart, too.) for the ghost faces and the mummy eyes.  But you could also use mini chocolate chips for the eyes and melted chocolate for the mouth… though that would be trickier, I’m guessing.  I think I’ll stick to the easier edible ink pen. Enjoy and have a Happy Halloween!

      Ghost and Mummy Chocolate Covered Strawberries
      Submitted by Mindy ~ The Sisters Cafe

      1 pound strawberries
      1 package of white chocolate chips (I like Guittard) or candy melts
      edible ink pen
      Wash and allow the strawberries to dry.  Set out wax paper or a silpat.  Melt the chocolate on 50% power in the microwave for two minutes.  Stir until the bowl no longer feels warm.  Then microwave for 30 seconds at 50% power, stirring in between, until the chocolate is completely melted.  Hold the strawberries by the stem and roll in the chocolate until covered.  Then gently place on wax paper.  Allow the chocolate to harden, then draw the ghost faces and/or mummy eyes.  Now pipe white chocolate onto the mummy strawberries to look like wrappings (I like these bottles better than piping bags).  You don’t have to be careful when you pipe the chocolate. I just do a combination of rotating the strawberry and looping the piping hand around the strawberry, and they turn out pretty cute.
      source : http://www.thesisterscafe.com/2011/10/ghost-mummy-chocolate-covered-strawberries
      11:05 PM Admin0
      I love chocolate covered strawberries!  Eating them makes me feel pampered… or somehow like it is a special occasion.  Plus, they are the quickest dessert, and they are always a hit. Whenever I make them, people get excited.  And I’m talking big people, little people, and somewhere-in-between people .  Everyone.  So I thought why not for Halloween?  And I’m glad I did.  These ghost and mummy strawberries turned out darling!  I used an edible ink pen (I bought mine on Amazon- I included the link for you below, but I’ve seen them in the cake decorating section of Walmart, too.) for the ghost faces and the mummy eyes.  But you could also use mini chocolate chips for the eyes and melted chocolate for the mouth… though that would be trickier, I’m guessing.  I think I’ll stick to the easier edible ink pen. Enjoy and have a Happy Halloween!

      Ghost and Mummy Chocolate Covered Strawberries
      Submitted by Mindy ~ The Sisters Cafe

      1 pound strawberries
      1 package of white chocolate chips (I like Guittard) or candy melts
      edible ink pen
      Wash and allow the strawberries to dry.  Set out wax paper or a silpat.  Melt the chocolate on 50% power in the microwave for two minutes.  Stir until the bowl no longer feels warm.  Then microwave for 30 seconds at 50% power, stirring in between, until the chocolate is completely melted.  Hold the strawberries by the stem and roll in the chocolate until covered.  Then gently place on wax paper.  Allow the chocolate to harden, then draw the ghost faces and/or mummy eyes.  Now pipe white chocolate onto the mummy strawberries to look like wrappings (I like these bottles better than piping bags).  You don’t have to be careful when you pipe the chocolate. I just do a combination of rotating the strawberry and looping the piping hand around the strawberry, and they turn out pretty cute.
      source : http://www.thesisterscafe.com/2011/10/ghost-mummy-chocolate-covered-strawberries

      Sponge cake
      LIGHT AND ZINGY: Victoria sponge with limoncello and balsamic strawberries.

      This is my take on the classic '4, 4, 4 and 2' Victoria sponge recipe that my mum used to make.
      Strawberries pair very well with lemon, and this recipe uses the Italian lemon liqueur, limoncello, which you'll find at Italian delis and selected liquor stores.
      VICTORIA SPONGE WITH LIMONCELLO AND BALSAMIC STRAWBERRIES

      need to know

      Main ingredientSugar
      Type of dishCake
      CourseDessert
      Cooking time30 min - 1 hour
      Serves/makes8
      Special optionsNut-free


      175 g unsalted butter, softened
      175 g caster sugar
      3 free-range eggs
      1 teaspoon vanilla extract
      175g self-raising flour, sifted
      1 tablespoon milk
      1 tablespoon limoncello or 2 teaspoons lemon juice
       200g mascarpone
      100 ml pure (whipping) cream
       icing sugar, for dusting
      Limoncello and balsamic strawberries
      400g strawberries, hulled and quartered
      2 tablespoons caster sugar
      2 tablespoons limoncello or 1 tablespoon lemon juice
      2 teaspoons balsamic vinegar
      1 small handful mint, finely chopped

      1. Preheat the oven to 180°C fan-forced and grease and line 2 × 20 cm springform tins.
      2. Cream the butter and sugar in a stand mixer for
      3. 5-6 minutes or until pale and creamy. Add the eggs, one at a time, beating between additions.
      4. Add the vanilla and half the flour and beat until incorporated. Add the milk and limoncello or lemon juice and beat to combine, then add the remaining flour and beat until combined.
      5. Divide the batter between the prepared tins and smooth the tops, then gently tap the tins on the benchtop to remove any air bubbles. Bake for 20-25 minutes or until the tops are golden brown and a skewer comes out clean when inserted into the centre of each cake.
      6. Remove from the oven and leave the cakes to cool in the tins for 5 minutes, before turning out onto wire racks to cool completely.
      7. Meanwhile, for the limoncello strawberries, place the strawberries, sugar, limoncello or lemon juice and balsamic vinegar in a small saucepan. Bring to a boil over high heat, then reduce the heat to low, add the mint and simmer for 2-3 minutes (the fruit should be soft but still holding its shape).
      8. Drain the mixture, reserving the syrup. Set the strawberries aside in a bowl. Return the syrup to the pan and place over medium heat. Simmer until reduced by half, then pour over the strawberries and leave to cool completely.
      9. Whisk together the mascarpone and cream until smooth and thick enough to hold its shape. Spread the mascarpone cream over one cake and place on a serving platter large enough to catch any juices from the filling.
      10. Top with the strawberry mixture, then sandwich the second sponge on top and dust liberally with icing sugar.
      This is an extract from What Katie Ate at the Weekend, published by Lantern on 22 October, $49.99. Out now. 
      12:08 AM Admin0

      Sponge cake
      LIGHT AND ZINGY: Victoria sponge with limoncello and balsamic strawberries.

      This is my take on the classic '4, 4, 4 and 2' Victoria sponge recipe that my mum used to make.
      Strawberries pair very well with lemon, and this recipe uses the Italian lemon liqueur, limoncello, which you'll find at Italian delis and selected liquor stores.
      VICTORIA SPONGE WITH LIMONCELLO AND BALSAMIC STRAWBERRIES

      need to know

      Main ingredientSugar
      Type of dishCake
      CourseDessert
      Cooking time30 min - 1 hour
      Serves/makes8
      Special optionsNut-free


      175 g unsalted butter, softened
      175 g caster sugar
      3 free-range eggs
      1 teaspoon vanilla extract
      175g self-raising flour, sifted
      1 tablespoon milk
      1 tablespoon limoncello or 2 teaspoons lemon juice
       200g mascarpone
      100 ml pure (whipping) cream
       icing sugar, for dusting
      Limoncello and balsamic strawberries
      400g strawberries, hulled and quartered
      2 tablespoons caster sugar
      2 tablespoons limoncello or 1 tablespoon lemon juice
      2 teaspoons balsamic vinegar
      1 small handful mint, finely chopped

      1. Preheat the oven to 180°C fan-forced and grease and line 2 × 20 cm springform tins.
      2. Cream the butter and sugar in a stand mixer for
      3. 5-6 minutes or until pale and creamy. Add the eggs, one at a time, beating between additions.
      4. Add the vanilla and half the flour and beat until incorporated. Add the milk and limoncello or lemon juice and beat to combine, then add the remaining flour and beat until combined.
      5. Divide the batter between the prepared tins and smooth the tops, then gently tap the tins on the benchtop to remove any air bubbles. Bake for 20-25 minutes or until the tops are golden brown and a skewer comes out clean when inserted into the centre of each cake.
      6. Remove from the oven and leave the cakes to cool in the tins for 5 minutes, before turning out onto wire racks to cool completely.
      7. Meanwhile, for the limoncello strawberries, place the strawberries, sugar, limoncello or lemon juice and balsamic vinegar in a small saucepan. Bring to a boil over high heat, then reduce the heat to low, add the mint and simmer for 2-3 minutes (the fruit should be soft but still holding its shape).
      8. Drain the mixture, reserving the syrup. Set the strawberries aside in a bowl. Return the syrup to the pan and place over medium heat. Simmer until reduced by half, then pour over the strawberries and leave to cool completely.
      9. Whisk together the mascarpone and cream until smooth and thick enough to hold its shape. Spread the mascarpone cream over one cake and place on a serving platter large enough to catch any juices from the filling.
      10. Top with the strawberry mixture, then sandwich the second sponge on top and dust liberally with icing sugar.
      This is an extract from What Katie Ate at the Weekend, published by Lantern on 22 October, $49.99. Out now. 

      Thursday, October 23, 2014

      This is the time of year when I start craving savory tarts. This vegetarian tart has vinegar-roasted onions, mushrooms, and ricotta cheese, making it a great appetizer for a group, or a dinner for two when served with a side salad. Why not? It's getting cold out there and sometimes you just need a dinner that feels like the food equivalent of sliding on a cashmere sweater: decadent and yet perfectly functional.
      The recipe is loosely based on one by Suzanne Goin in her magnificent book,Sunday Suppers at Lucques. It might sound a little complicated, but I promise it's not. As long as you have the ingredients on hand and some time to luxuriate in the kitchen, it's really not much of a challenge.
      For mushrooms, you can use a mixture of varieties or stick with one. I like to combine the common cremini with some rehydrated dried porcini. For onions, try cipollini, sweet Vidalia, or standard yellow or purple onions.

      Onion and Mushroom Tart

      Makes one 9-inch tart
      For the crust:2 cups unbleached all-purpose flour
      1/4 teaspoon salt
      3/4 cup (1 1/2 sticks) cold unsalted butter, cut into small cubes
      2 tablespoons ice water
      For the filling:1 pound onions
      3 tablespoons olive oil, divided
      2 tablespoons balsamic vinegar
      1 1/4 teaspoons salt, divided
      1/2 teaspoon freshly ground black pepper, divided
      2 tablespoons butter
      1 1/2 pounds mushrooms, sliced
      1 large egg
      3/4 cup ricotta cheese
      3/4 cup Parmesan cheese, divided
      1/4 cup heavy cream
      1/4 cup chopped chives or green onions
      Preheat the oven to 350° F.
      To make the dough, place the flour and salt in a food processor and pulse. Drop in the butter and pulse until just barely the texture of oatmeal. Add the ice water slowly and pulse once or twice, until the dough clumps together. Turn onto a floured board and form into a ball. Wrap in plastic wrap and chill in refrigerator for at least 30 minutes.
      Meanwhile, peel and remove the root ends from the onions. Slice them in quarters and place in a pie dish or small roaster. Pour 2 tablespoons of olive oil, the vinegar, 1 teaspoon salt and 1/4 teaspoon pepper over top. Roast until the onions are soft and begin to color but still hold their shape, about 45 minutes. Remove from the oven and cool.
      While the onions are roasting, cook the mushrooms. Over medium heat, melt the butter. Add mushrooms, 1/4 teaspoon salt and 1/4 teaspoon pepper, and sauté for about 5 minutes until golden. Remove from the heat.
      When pastry dough has chilled, roll it out onto a lightly floured surface to a circle roughly 12 inches in diameter. Gently transfer to a tart ring, and fit into the ring evenly. Pierce bottom with a fork and return to refrigerator to chill another 20 to 30 minutes.
      Separate the egg and transfer the yolk to a small bowl; reserve the egg white for the topping. Mix the egg yolk, ricotta, remaining 1 tablespoon olive oil, 1/2 cup of Parmesan, and chives. Remove the tart shell from refrigerator. Spread the ricotta mixture evenly across the bottom of the tart shell. Nestle the onions across ricotta base and scatter the mushrooms in between onions.
      In another small bowl, beat the reserved egg white, heavy cream and the remaining 1/4 cup Parmesan. Pour mixture evenly over top of onion and mushroom filling.
      Cover the tart with foil and bake at 350°F for 30 minutes. Remove the foil and bake another 15 minutes, until top is bubbling and crust is slightly brown, but not too dark.
      Sprinkle chives over top before servings. Serve warm or at room temperature.
      11:49 PM Admin0
      This is the time of year when I start craving savory tarts. This vegetarian tart has vinegar-roasted onions, mushrooms, and ricotta cheese, making it a great appetizer for a group, or a dinner for two when served with a side salad. Why not? It's getting cold out there and sometimes you just need a dinner that feels like the food equivalent of sliding on a cashmere sweater: decadent and yet perfectly functional.
      The recipe is loosely based on one by Suzanne Goin in her magnificent book,Sunday Suppers at Lucques. It might sound a little complicated, but I promise it's not. As long as you have the ingredients on hand and some time to luxuriate in the kitchen, it's really not much of a challenge.
      For mushrooms, you can use a mixture of varieties or stick with one. I like to combine the common cremini with some rehydrated dried porcini. For onions, try cipollini, sweet Vidalia, or standard yellow or purple onions.

      Onion and Mushroom Tart

      Makes one 9-inch tart
      For the crust:2 cups unbleached all-purpose flour
      1/4 teaspoon salt
      3/4 cup (1 1/2 sticks) cold unsalted butter, cut into small cubes
      2 tablespoons ice water
      For the filling:1 pound onions
      3 tablespoons olive oil, divided
      2 tablespoons balsamic vinegar
      1 1/4 teaspoons salt, divided
      1/2 teaspoon freshly ground black pepper, divided
      2 tablespoons butter
      1 1/2 pounds mushrooms, sliced
      1 large egg
      3/4 cup ricotta cheese
      3/4 cup Parmesan cheese, divided
      1/4 cup heavy cream
      1/4 cup chopped chives or green onions
      Preheat the oven to 350° F.
      To make the dough, place the flour and salt in a food processor and pulse. Drop in the butter and pulse until just barely the texture of oatmeal. Add the ice water slowly and pulse once or twice, until the dough clumps together. Turn onto a floured board and form into a ball. Wrap in plastic wrap and chill in refrigerator for at least 30 minutes.
      Meanwhile, peel and remove the root ends from the onions. Slice them in quarters and place in a pie dish or small roaster. Pour 2 tablespoons of olive oil, the vinegar, 1 teaspoon salt and 1/4 teaspoon pepper over top. Roast until the onions are soft and begin to color but still hold their shape, about 45 minutes. Remove from the oven and cool.
      While the onions are roasting, cook the mushrooms. Over medium heat, melt the butter. Add mushrooms, 1/4 teaspoon salt and 1/4 teaspoon pepper, and sauté for about 5 minutes until golden. Remove from the heat.
      When pastry dough has chilled, roll it out onto a lightly floured surface to a circle roughly 12 inches in diameter. Gently transfer to a tart ring, and fit into the ring evenly. Pierce bottom with a fork and return to refrigerator to chill another 20 to 30 minutes.
      Separate the egg and transfer the yolk to a small bowl; reserve the egg white for the topping. Mix the egg yolk, ricotta, remaining 1 tablespoon olive oil, 1/2 cup of Parmesan, and chives. Remove the tart shell from refrigerator. Spread the ricotta mixture evenly across the bottom of the tart shell. Nestle the onions across ricotta base and scatter the mushrooms in between onions.
      In another small bowl, beat the reserved egg white, heavy cream and the remaining 1/4 cup Parmesan. Pour mixture evenly over top of onion and mushroom filling.
      Cover the tart with foil and bake at 350°F for 30 minutes. Remove the foil and bake another 15 minutes, until top is bubbling and crust is slightly brown, but not too dark.
      Sprinkle chives over top before servings. Serve warm or at room temperature.

      Wednesday, October 22, 2014

      The Famous Husk Cheeseburger Recipe
      Photograph by Peter Frank Edwards
      Husk Cheeseburger 
      Makes 10 cheeseburgers
      When I opened Husk, I knew we had to have a cheeseburger on the menu. Everyone has their own idea of the perfect burger; mine was inspired by the drive-in that my family used to take me to when I was young. Robo’s was the only real “restaurant” in my hometown, and my family just loved it. We would go there after my Little League baseball games. As a game wound down, I would be daydreaming about that burger, shake, and crinkle-cut fries. It’s probably the reason for some missed fly balls. 
      What I remember most about the cheeseburger was the squishy bun and how wonderful it was to eat the double patty covered in gooey American cheese. This recipe is a tip of the hat to that burger. I’ve changed it a little to make it my own—I wouldn’t dare try and replicate the burger from Robo’s. This recipe feeds a crowd, but you can halve it for a smaller group. 
      If you don’t have a meat grinder, ask the butcher to grind the meats for you.
      Special Sauce
      1¾ cups mayonnaise, preferably Duke’s
      1¼ cups yellow mustard
      5 tablespoons ketchup
      ½ cup Bread-and-Butter Pickles, drained and cut into ⅛-inch dice
      ¼ cup pickled jalapeños, drained and cut into ⅛-inch dice
      Grated zest (use a Microplane) and juice of 1 lemon
      1 tablespoon Husk Hot Sauce (or other hot sauce)
      Kosher salt and freshly ground black pepper to taste
      2 tablespoons pepper vinegar, preferably Texas Pete brand
      Cheeseburgers
      One 3-pound fresh boneless chuck roast
      12 ounces fresh flank steak
      3 ounces bacon, preferably Benton’s
      3 tablespoons unsalted butter, at room temperature
      10 hamburger buns, preferably potato rolls
      1 cup shaved white onion
      20 slices American cheese
      50 Bread-and-Butter Pickles
      For the sauce:
      1. Combine all of the ingredients in a large container and stir together to blend well. Cover, and refrigerate. (Tightly covered, the sauce will keep for up to 5 days in the refrigerator.)
      For the cheeseburgers:
      1. Grind the chuck, flank steak, and bacon through a meat grinder fitted with the large die into a bowl. Mix gently to combine. Then run half of the mixture through the small die. Mix the two together.
      2. Portion the meat mixture into twenty 3-ounce patties, about ½ inch thick (each burger gets 2 patties). If not cooking right away, arrange on a baking sheet, cover tightly with plastic wrap, and refrigerate. (The patties can be refrigerated for up to 1 day. Remove from the refrigerator about 30 minutes before you’re ready to cook; it’s important that the patties are not ice-cold when they hit the hot pan.)
      3. Generously butter the tops and bottoms of the buns. Toast on a griddle until nice and golden brown. Reserve.
      4. Heat two 12-inch cast-iron skillets until as hot as possible. Divide the patties between the two hot pans. When the patties are nice and charred, about 2 minutes, flip them over and cook for 2 minutes more for medium. Place the onion slices on 10 of the patties. Place a slice of the cheese on all of the patties and allow it to melt, about 30 seconds. Stack the non-onion patties on top of the onion patties. Remove from the heat.
      5. Smear both sides of the buns with special sauce. Place 5 pickles on the bottom half of each bun. Add the burger patties and top with the top halves of the buns. Serve at once.
      Excerpted from Heritage by Sean Brock (Artisan Books). Copyright © 2014.
      11:41 PM Admin0
      The Famous Husk Cheeseburger Recipe
      Photograph by Peter Frank Edwards
      Husk Cheeseburger 
      Makes 10 cheeseburgers
      When I opened Husk, I knew we had to have a cheeseburger on the menu. Everyone has their own idea of the perfect burger; mine was inspired by the drive-in that my family used to take me to when I was young. Robo’s was the only real “restaurant” in my hometown, and my family just loved it. We would go there after my Little League baseball games. As a game wound down, I would be daydreaming about that burger, shake, and crinkle-cut fries. It’s probably the reason for some missed fly balls. 
      What I remember most about the cheeseburger was the squishy bun and how wonderful it was to eat the double patty covered in gooey American cheese. This recipe is a tip of the hat to that burger. I’ve changed it a little to make it my own—I wouldn’t dare try and replicate the burger from Robo’s. This recipe feeds a crowd, but you can halve it for a smaller group. 
      If you don’t have a meat grinder, ask the butcher to grind the meats for you.
      Special Sauce
      1¾ cups mayonnaise, preferably Duke’s
      1¼ cups yellow mustard
      5 tablespoons ketchup
      ½ cup Bread-and-Butter Pickles, drained and cut into ⅛-inch dice
      ¼ cup pickled jalapeños, drained and cut into ⅛-inch dice
      Grated zest (use a Microplane) and juice of 1 lemon
      1 tablespoon Husk Hot Sauce (or other hot sauce)
      Kosher salt and freshly ground black pepper to taste
      2 tablespoons pepper vinegar, preferably Texas Pete brand
      Cheeseburgers
      One 3-pound fresh boneless chuck roast
      12 ounces fresh flank steak
      3 ounces bacon, preferably Benton’s
      3 tablespoons unsalted butter, at room temperature
      10 hamburger buns, preferably potato rolls
      1 cup shaved white onion
      20 slices American cheese
      50 Bread-and-Butter Pickles
      For the sauce:
      1. Combine all of the ingredients in a large container and stir together to blend well. Cover, and refrigerate. (Tightly covered, the sauce will keep for up to 5 days in the refrigerator.)
      For the cheeseburgers:
      1. Grind the chuck, flank steak, and bacon through a meat grinder fitted with the large die into a bowl. Mix gently to combine. Then run half of the mixture through the small die. Mix the two together.
      2. Portion the meat mixture into twenty 3-ounce patties, about ½ inch thick (each burger gets 2 patties). If not cooking right away, arrange on a baking sheet, cover tightly with plastic wrap, and refrigerate. (The patties can be refrigerated for up to 1 day. Remove from the refrigerator about 30 minutes before you’re ready to cook; it’s important that the patties are not ice-cold when they hit the hot pan.)
      3. Generously butter the tops and bottoms of the buns. Toast on a griddle until nice and golden brown. Reserve.
      4. Heat two 12-inch cast-iron skillets until as hot as possible. Divide the patties between the two hot pans. When the patties are nice and charred, about 2 minutes, flip them over and cook for 2 minutes more for medium. Place the onion slices on 10 of the patties. Place a slice of the cheese on all of the patties and allow it to melt, about 30 seconds. Stack the non-onion patties on top of the onion patties. Remove from the heat.
      5. Smear both sides of the buns with special sauce. Place 5 pickles on the bottom half of each bun. Add the burger patties and top with the top halves of the buns. Serve at once.
      Excerpted from Heritage by Sean Brock (Artisan Books). Copyright © 2014.
      pumpkins
      Moment Open/Getty Images
      1. The Jack-o-Lantern tradition dates back centuries, when people in Ireland decorated turnips and potatoes with scary faces to frighten away a scary character named "Stingy Jack," who, accoring to an old myth, roamed the Earth after his death, as theHistory Channel tells the story. Irish immigrants then brought the practice to the U.S., where it was adapted to the native pumpkins.
      2. Pumpkins were first grown in Central America. They’ve grown in North America for 5,000 years, and today, about 95% of the pumpkins processed in the U.S. are grown in Illinois, according to the University of Illinois. Morton, Illinois calls itself the “Pumpkin Capital of the World” (supposedly processing 80% of the world’s canned pumpkin).
      3. Though the original Cinderella story dates back to about the 1st century B.C., the detail about thepumpkin turning into a carriage reportedly wasn’t added until 1697, in a French version by Charles Perrault called “Cendrillon.” 

      4. One cup of mashed pumpkin contains a whopping 245% of your recommended daily intake of Vitamin A, plus 19% of your Vitamin C and 8 percent of your iron). That’s a veritable superfood (just not in latte form—pumpkin spice lattes typically don’t include actual pumpkins, only the spice mix).

      5. When it comes to baking, 2- to 8-pound varieties are your best bets for flavor and density. Save the big ones for carving.

      6. The United States produces more than one billion pounds of pumpkins each year.

      7. A pumpkin is technically a fruit, and a member of the gourd family. Their botanical name is Cucurbita maxima, C. moschata, C. argyrosperma, and they require 75 to 100 frost-free days to grow, meaning they need to be planted by late May to early July to be ready in time for Halloween.

      8. The Guinness World Record for the Heaviest Pumpkin is currently held by Ron Wallace in the United States for his 2,009-pound pumpkin, presented at the New England Giant Pumpkin Weigh-off at Topsfield Fair in Topsfield, Massachusetts in September 2012.

      9. The oldest pumpkin seeds date back 8,000 to 10,000 years.

      10. According to the American Pie Council (yup, there is such a thing), pumpkin is America’s secondfavorite kind of pie. Nineteen percent report preferring apple pie, compared to 13% for pumpkin.
      11:40 PM Admin0
      pumpkins
      Moment Open/Getty Images
      1. The Jack-o-Lantern tradition dates back centuries, when people in Ireland decorated turnips and potatoes with scary faces to frighten away a scary character named "Stingy Jack," who, accoring to an old myth, roamed the Earth after his death, as theHistory Channel tells the story. Irish immigrants then brought the practice to the U.S., where it was adapted to the native pumpkins.
      2. Pumpkins were first grown in Central America. They’ve grown in North America for 5,000 years, and today, about 95% of the pumpkins processed in the U.S. are grown in Illinois, according to the University of Illinois. Morton, Illinois calls itself the “Pumpkin Capital of the World” (supposedly processing 80% of the world’s canned pumpkin).
      3. Though the original Cinderella story dates back to about the 1st century B.C., the detail about thepumpkin turning into a carriage reportedly wasn’t added until 1697, in a French version by Charles Perrault called “Cendrillon.” 

      4. One cup of mashed pumpkin contains a whopping 245% of your recommended daily intake of Vitamin A, plus 19% of your Vitamin C and 8 percent of your iron). That’s a veritable superfood (just not in latte form—pumpkin spice lattes typically don’t include actual pumpkins, only the spice mix).

      5. When it comes to baking, 2- to 8-pound varieties are your best bets for flavor and density. Save the big ones for carving.

      6. The United States produces more than one billion pounds of pumpkins each year.

      7. A pumpkin is technically a fruit, and a member of the gourd family. Their botanical name is Cucurbita maxima, C. moschata, C. argyrosperma, and they require 75 to 100 frost-free days to grow, meaning they need to be planted by late May to early July to be ready in time for Halloween.

      8. The Guinness World Record for the Heaviest Pumpkin is currently held by Ron Wallace in the United States for his 2,009-pound pumpkin, presented at the New England Giant Pumpkin Weigh-off at Topsfield Fair in Topsfield, Massachusetts in September 2012.

      9. The oldest pumpkin seeds date back 8,000 to 10,000 years.

      10. According to the American Pie Council (yup, there is such a thing), pumpkin is America’s secondfavorite kind of pie. Nineteen percent report preferring apple pie, compared to 13% for pumpkin.
      All Southerners dream of coating bacon with bourbon and candied brown sugar, but how many actually achieve this dream? Now everyone can, thanks to Southern Living’s Bourbon & Bacon: The Ultimate Guide to the South’s Favorite Food Groups, by Morgan Murphy, an authority on these regional favorites. Check out this recipe—straight from the book’s pages—and pick up a copy today!
      Bourbon Candied Bacon Recipe
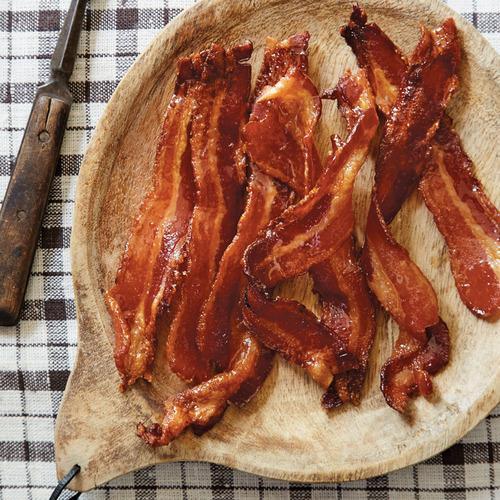
      Bourbon Candied BaconSavory and sweet, this recipe for Bourbon Candied Bacon will tantalize your taste buds. Master this treat with ease and your friends will start calling you king (or queen) of the hog.
      Ingredients12 thick-cut hickory- or applewood-smoked bacon slices
      1/2 cup brown sugar
      1/4 cup bourbon
      Preparation1. Preheat oven to 375°. Arrange bacon in a single layer on a wire rack in an aluminum foil-lined broiler pan. Bake at 375° for 10 minutes or just until bacon begins to curl at ends.
      2. Meanwhile, combine brown sugar and bourbon in a small bowl, stirring until sugar dissolves.
      3. Remove bacon from oven. Brush both sides of bacon with brown sugar mixture. Bake at 375° for 42 more minutes or until bacon is crisp around edges and browned, brushing both sides of bacon with brown sugar mixture every 10 minutes.
      4. Cool completely on a wire rack (about 30 minutes). Bacon will become crisp as it cools.
      11:36 PM Admin0
      All Southerners dream of coating bacon with bourbon and candied brown sugar, but how many actually achieve this dream? Now everyone can, thanks to Southern Living’s Bourbon & Bacon: The Ultimate Guide to the South’s Favorite Food Groups, by Morgan Murphy, an authority on these regional favorites. Check out this recipe—straight from the book’s pages—and pick up a copy today!
      Bourbon Candied Bacon Recipe
      Bourbon Candied BaconSavory and sweet, this recipe for Bourbon Candied Bacon will tantalize your taste buds. Master this treat with ease and your friends will start calling you king (or queen) of the hog.
      Ingredients12 thick-cut hickory- or applewood-smoked bacon slices
      1/2 cup brown sugar
      1/4 cup bourbon
      Preparation1. Preheat oven to 375°. Arrange bacon in a single layer on a wire rack in an aluminum foil-lined broiler pan. Bake at 375° for 10 minutes or just until bacon begins to curl at ends.
      2. Meanwhile, combine brown sugar and bourbon in a small bowl, stirring until sugar dissolves.
      3. Remove bacon from oven. Brush both sides of bacon with brown sugar mixture. Bake at 375° for 42 more minutes or until bacon is crisp around edges and browned, brushing both sides of bacon with brown sugar mixture every 10 minutes.
      4. Cool completely on a wire rack (about 30 minutes). Bacon will become crisp as it cools.